Introduction
This multi-part tutorial is a complete guide to Setting up WordPress on AWS. This part of our tutorial sets up an AWS Account, Relational Database Service, then installs the necessary system software such as Nginx, HHVM for PHP, SSMTP for email, and Monit for monitoring.
Links to other parts of our tutorial
- Part One, Introduction
- Part Two, Setting up AWS for WordPress with RDS, Nginx, HHVM, PHP, SSMTP
- Part Three, Migrating WordPress Sites Into AWS, including RDS Setup
- Part Four, Wordpress Website Optimization, Nginx Caching and DNS Changes to Go Live
- Part Five, Setting up HTTPS and HTTP/2 using Free Let’s Encrypt Certificates
- Part Six, Setting up CloudFlare free CDN for global caching
Page Table of Contents / Index
- AWS Basics
- Automatically restart failed EC2 instance
- Monitor EC2 disk space
- RDS Setup
- FTP Installation
- HHVM Setup
- Nginx Installation
- Building Nginx From Source
- Nginx Configuration
- Monit Monitoring Software Installation
- Setting Amazon Linux Timezone
- File Permissions
- Email Delivery
The Basics of Setting up AWS – AWS Signup, , User Setup, VPC, Security Group, Starting an EC2 Instance
Amazon has a great signup guide available here, so I’m not going to go through all the details here – though note that I have added some extras so do look at this list below. The main points are:
- Sign Up for AWS
- Create an IAM User, after creating an administrators user group. You shouldn’t use the main user for day to day work, it’s less secure and has access to your billing details. Once you have things set up you’ll probably want to restrict this user further.
- Set up multi-factor authentication for both your root user and (optionally) your new “admin” user. There’s a good AWS guide here. We use the app “Authy” on PC (Chrome app store) and Android, it’s also available on iPhone. Check out the Authy website. I have it enabled for my root user but not my admin user while I’m intensively working on AWS, as it gets annoying.
- While logged in as the root user set up billing / cost alerts that tell you when you exceed the free tier, as described here. You might like to add other warnings, say when it reaches $5, $10, and $20, just in case something doesn’t work as you expect. You first enable billing alerts, then set up billing alarms. It’s easiest to create the first alert using the wizard then copy the alert, changing the dollar value.
- Log into the AWS console as your new user.
- Create a Key Pair for your new admin user (no need for the root user).
- Select your region – you should choose the region closest to your key customers, we’ll add CloudFlare later which will make things fast worldwide.
- Create a Virtual Private Cloud (VPC). I suggest you use the default VPC as otherwise you have extra steps to get things working, but I created my own because apparently I’m a glutton for punishment.
- Create a Security Group – there’s a default you can use, you may have to be using the default VPC for this, I’m not sure
If you don’t want to use the default VPC (like I didn’t – why make things easy?!) you need to do the following:
- Use the VPC Wizard to create a new VPC. The key settings is you’re doing a simple WordPress website is “VPC with Single Public Subnet”, use the default IP addresses, and give things descriptive names.

Click to enlarge
- Still in the VPC Dashboard, create an Internet Gateway for your VPC (check there isn’t one associated with your VPC first). A VPC isn’t connected to the Internet by default as not all servers need to be on the Internet. There’s a good guide on this page under “Creating a VPC with an Internet Gateway”. This is fairly straightforward, all you need to enter is a name. You do need to attach your Internet Gateway to your VPC, under Internet Gateways in the VPC Dashboard.
- Your VPC has a default Security Group, which is for routing traffic to your various servers and acts as a firewall. You need to set up the rules to allow traffic into your VPC. The Amazon guide outlines this here. Here are some screen shots showing how I set mine up. Note that you should only allow SSH access from your IP address, but as many people have dynamic IPs I allow a /24 network address in – though it’s quite possible that your IP could change outside this range. You should replace the IP with yours from WhatIsMyIP, though changing the last number to zero and adding /24. Allowing connections from 0.0.0.0/0 means “anywhere” (which is ideal for http/s), whereas giving an IP address with /24 says only you or someone with an IP address very similar to yours is allowed to SSH into the server. It’s also protected by public key, so the risks are fairly low even if you let anyone SSH in, but it opens up another attack vector.
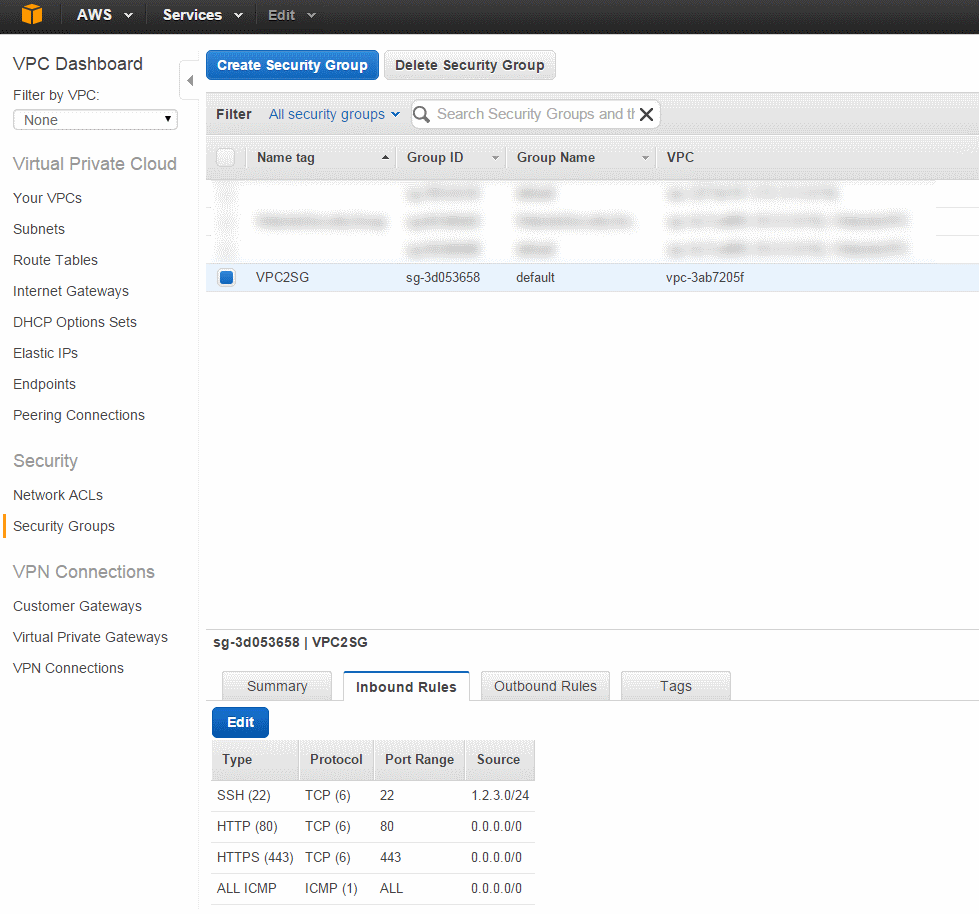
Click to enlarge
Next we start an instance, as outlined by AWS Getting Started tutorial. The main steps here are:
- Launch an Amazon EC2 Instance (make a note of the public IP address)
- Go into the Elastic IP section of the EC2 control panel and request an Elastic IP, and associate it with your new instance. This will remove the automatically assigned public IP and replace it with the elastic IP. NB: One elastic IPs is free when in use, but if you turn your server off you’re charged around $3.60 per month. Once you have an elastic IP you shouldn’t turn your server off. You can do this step later if you like.
- Connect to Your Instance (using putty). The easiest way to get the IP address is to select your instance in the EC2 console then hit “connect”. It will give you a connect string to put into the Putty IP address field that will look something like [email protected] and putty will need your private certificate, converted to ppk format. You put this into Putty -> Connection -> SSH -> Auth. Remember to save your settings so you can connect again later easily.
If you have trouble connecting to your instance it will likely be a problem with your internet gateway, security groups, or routing. There’s a good problem solving guide here.
Automatically Restarting Failed AWS EC2 Instances
Occasionally EC2 instances fail, because of hardware faults or maintenance. AWS typically doesn’t restart your instance for you, though you may get warnings by email to restart your instance by a certain time. A restart typically moves you to different hardware.
If you want to restart your instance automatically set up an alarm in cloudwatch, as described by this web page. The major steps are:
- Right click your instance in EC2 instances, choose “CloudWatch Monitoring”, then choose “add / edit alarms”.
- Hit Create Alarm
- Set up a notification to yourself.
- Choose “take action” and “reboot this instance”.
- Choose “whenever”, “status check failed (instance)”, “2 periods of 1 minute”
- Name the alarm.
- Ok out
Set up Disk Space Monitoring
Because EBS is a block devices Amazon doesn’t know what you’re using it for. You can use scripts that Amazon provides to upload this information to CloudWatch.
Steps:
- Create a new IAM user, save their access keys
- In the AWS web control panel go to IAM -> Policies -> Create policies -> Policy generator
- Add the policies below
cloudwatch:PutMetricData
cloudwatch:GetMetricStatistics
cloudwatch:ListMetrics
ec2:DescribeTags
Follow steps on this page around downloading and running the scripts. I suggest putting them in /opt
cp awscreds.template awscreds.conf
vi awscreds.conf
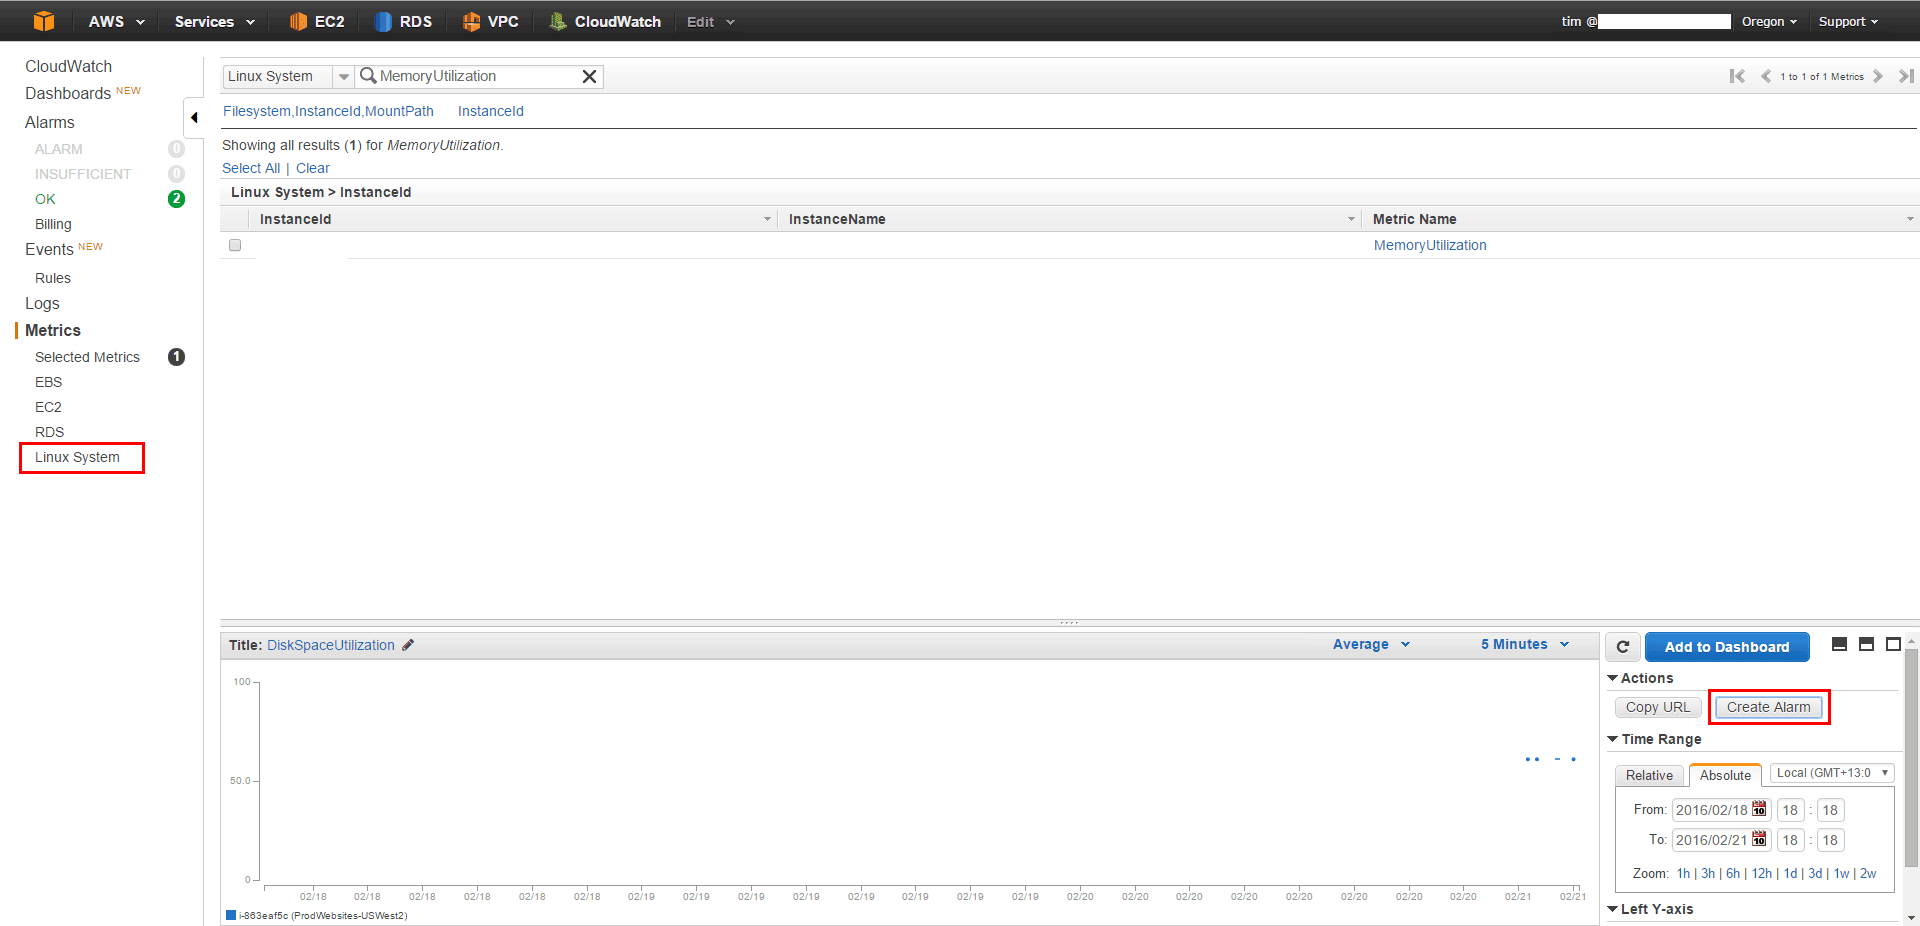
Edit the file as per user details created above, with the access key and the secret key. Run this command to check it works – it should create a “Linux System” node in the CloudWatch dashboard – give it a few minutes to get through. Note that this monitors memory as well, not including caches, which is interesting but not really all that useful.
/opt/aws/aws-scripts-mon/mon-put-instance-data.pl --mem-util --disk-space-util --disk-path=/
Now edit the crontab file to run the scripts every hour – you can make it more often if you like, but disk space doesn’t typically change that quickly.
crontab -e
 0 * * * * /opt/aws/aws-scripts-mon/mon-put-instance-data.pl --mem-util --disk-space-util --disk-path=/ --from-cron 2>&1
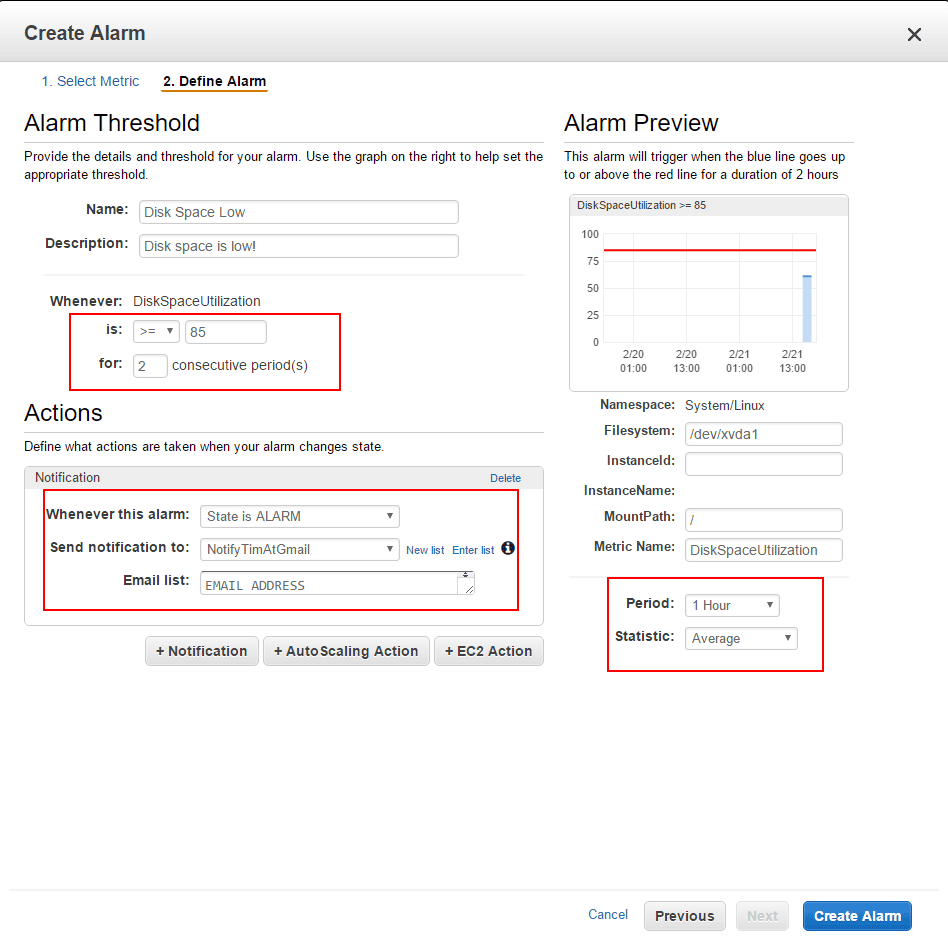
Next you want to set up alerts to notify you if disk space gets low. Simple view your custom metric in CloudWatch, in the little time/scope control at the bottom right click “Create Alarm”, then fill in your thresholds (eg 85% for 2 periods) and the notification details. I also change the period to 1 hour, because I’m not really in a hurry. This is shown in these two diagrams.
Click to enlarge
Click to enlarge
Setting up a MariaDB or MySQL Database on Amazon RDS
Amazon RDS (Relational Database Service) lets you run any of a number of databases on a separate instance, keeping it secure, performance high, with redundancy and backups built in. It’s also free for a year on the AWS free tier, and it means not having to use up RAM and CPU on our main server (which I found we actually have plenty of even with just 1GB RAM). At the end of the free year I may install a database server on the server, or I may keep it – it depends on performance. I’ve chosen to use MariaDB, which is based on MySQL, as it’s a more open, faster moving project than MySQL.
Setting up an RDS instance is fairly simple. Follow this AWS MySQL Guide or this MariaDB Guide for the basics – just follow the wizard then make the necessary change to the security groups (aka firewall). Key things are:
- Make sure it’s in the same availability zone as your EC2 instance, for performance
- Optionally put it in the same security group as your EC2 instance, which will make configuration easier. I put it in another security group so I can add rules to connect to the database from my PC later if required.
- Do a single tier deployment if you want to stay on the free tier. This is less reliable, but if you have a single EC2 server it makes little difference – if either RDS or EC2 goes down, the whole website goes down
- I’ve chosen MariaDB rather than MySQL. MariaDB is fork of MySQL that’s more open, faster, and more efficient than MySQL. It’s 100% compatible with MySQL.
- Create a new VPC Security Group, so you can control database access separately from the EC2 instance.
- I’ve used the World Clock to try to ensure my maintenance and backup windows are when neither of my key audiences are awake. I’ve set it up so both are between midnight and 7am in the USA and New Zealand.
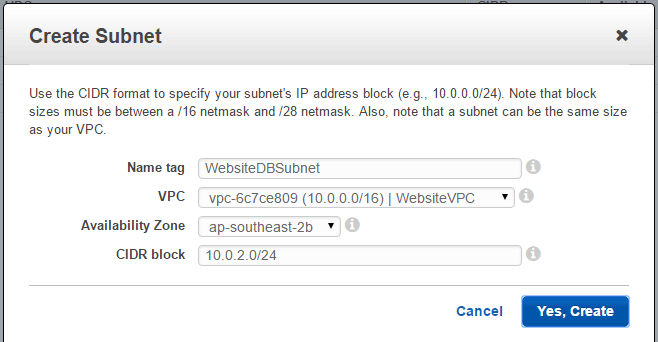
- Make sure you have subnets created in at least two AZs within your VPC otherwise RDS won’t create an instance. You can specify either AZ for the database.
- If you want your database public accessible you MUST set it up at creation time. This is super useful so you can use a graphical client rather than just the command line. I didn’t set it up at creation time when I first set things up and couldn’t get it working publicly. When I moved my server to a new region I set up public access and it made things a lot easier. Make sure to set up security groups so only your IP can access the instance.
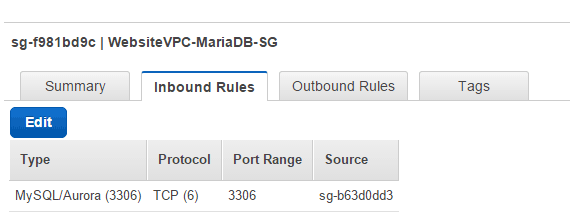
- Change your security group to allow access to the instance. Go into your new security group, inbound rules, hit edit. Choose “MySQL/Aurora”, click in the source box and choose the security group associated with your EC2 instance. OK it and save. It should start working within 30 seconds. To test connectivity use telnet from your EC2 instance, as below
yum install telnet
telnet dbname.something.ap-southeast-2.rds.amazonaws.com 3306
If you get some junk back that’s good, it’s connected. If you get nothing back something is wrong that you’ll need to diagnose.
Here are screenshots of my RDS setup which may help.
Click to enlarge
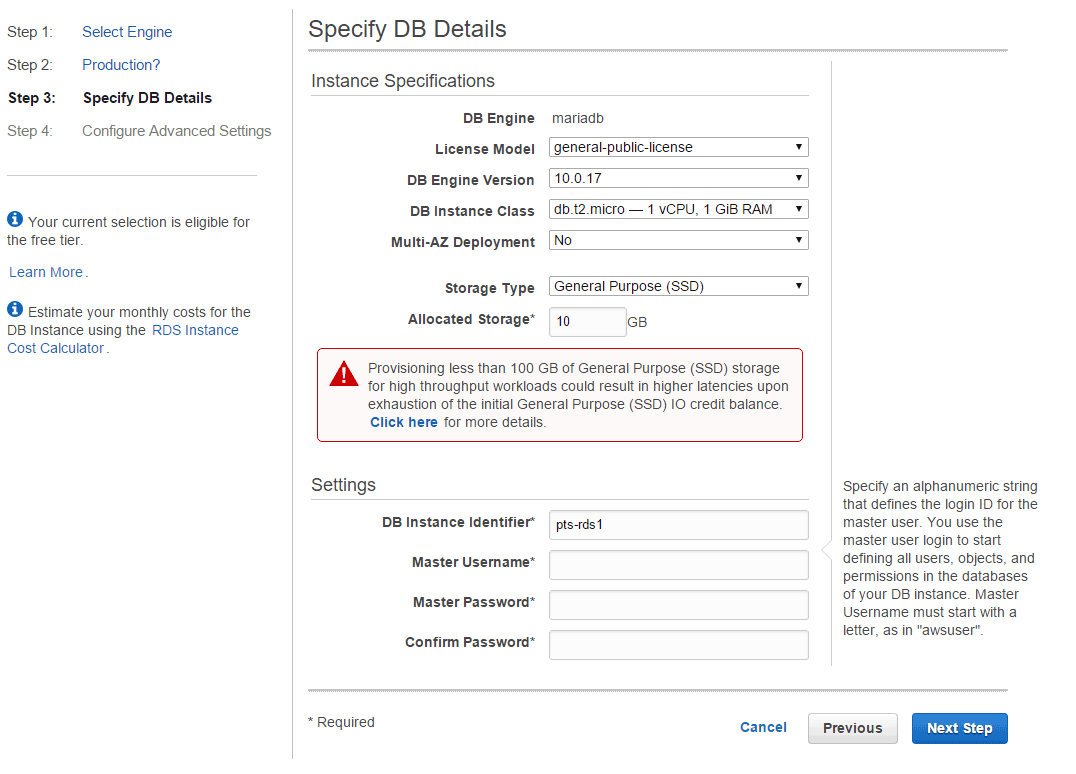
Click to enlarge
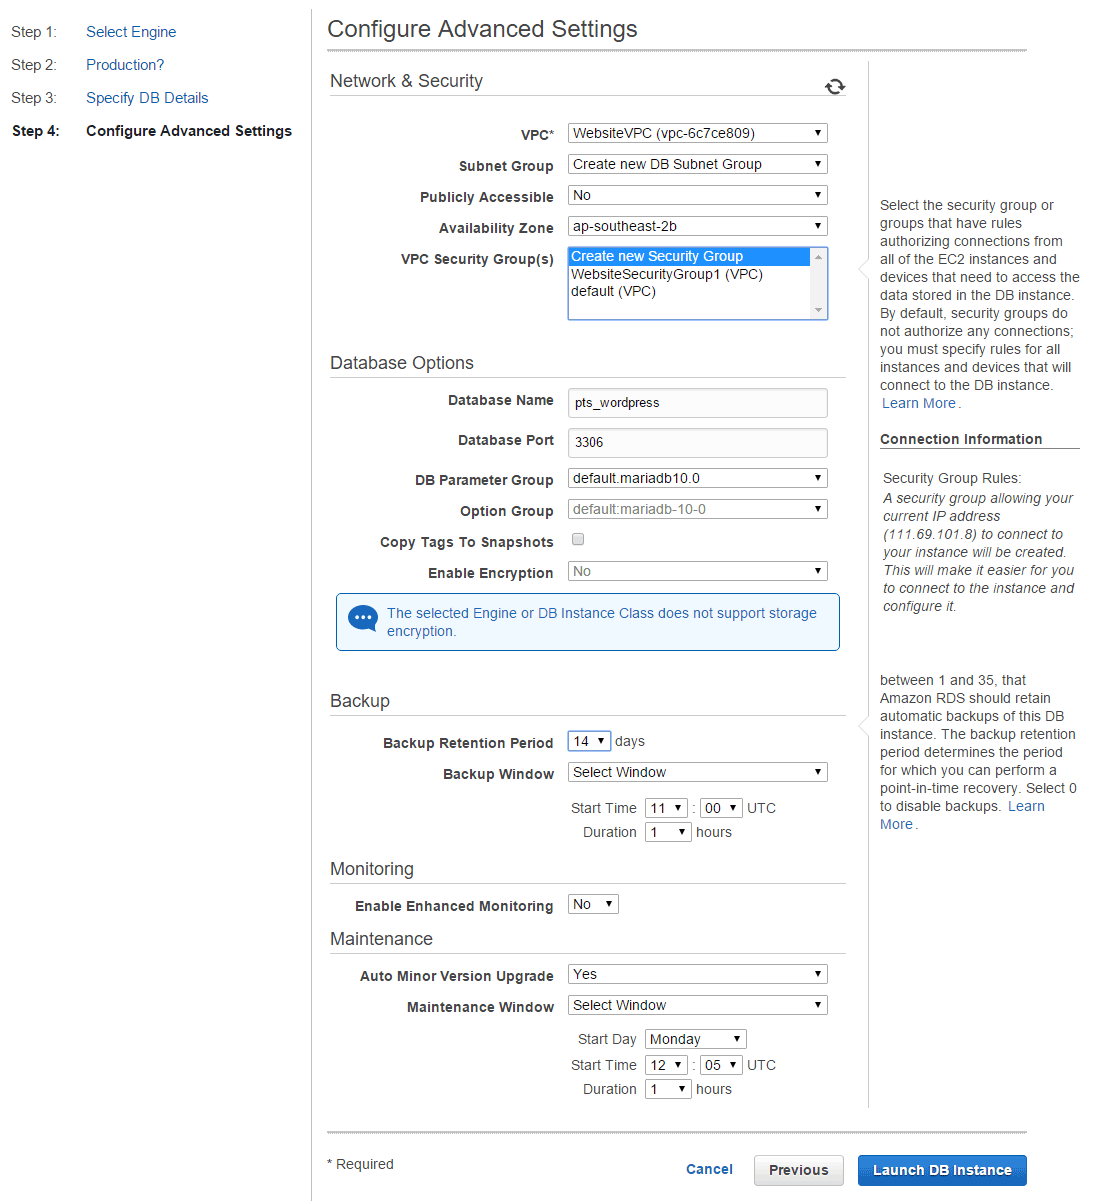
Click to enlarge
Click to enlarge
Software Setup
Let’s start the software setup by updating the list of available packages. Note that anything that
looks like this
is a command to type into your console. This first command means we don’t have to type sudo (Super User DO) before each command, the second updates the packages available from the repositories.
SFTP Server
Amazon Linux includes an SFTP server by default. It’s configured for SFTP access, which is OpenSSH’s file transfer protocol, rather than standard insecure FTP. Connection parameters are as follows:
Host name: ip address of your instance
Protocol: SFTP
Port number: 22
User name: ec2-user
Password: leave blank
Private key file: path to your private key
If you have problems you can add vsftp, by following the instructions on this page. If that page stops working just use Google to find another guide. I couldn’t get SFTP working from my old host, my FTP worked fine.
Installing HHVM on Amazon Linux
Next we install HHVM, a fast PHP/Hack (a language) interpreter written by Facebook engineers to help make Facebook fast that I’ve found in testing to be significantly faster than the official PHP 5.x distribution. PHP7 has just been released but isn’t yet compatible with one of the themes I run on my websites, but it’s around the same performance as HHVM. Using a fast PHP version is important because we’re somewhat resource constrained by our small t2.micro instance. Note that these commands download a fairly large list of packages, and it can take a little bit of time to run.
Update March 28 2016: www.hop5.in who hosted the repository below appears to have gone offline, I’m currently looking for a better way to install HHVM on Amazon linux that should be more reliable going forward. HHVM is open source, but building it manually is very time consuming and somewhat difficult. Right now I don’t know of any easy way to get HHVM installed onto Amazon Linux. The best option I’ve found is a repository and instructions on this github page, though I haven’t upgraded my main server yet. When I cloned my main server and upgraded HHVM there were problems connecting to the database, but I don’t know if that was a problem with HHVM, Nginx, or the AWS setup.
Update April 2017: My current advice is to use either PHP 7.0, or if you have compatibility issues, PHP 5.6.
yum install epel-release
yum-config-manager --enable epel
cd /etc/yum.repos.d
wget http://www.hop5.in/yum/el6/hop5.repo
echo 'priority=9' >> hop5.repo
echo 'includepkgs=glog,tbb' >> hop5.repo
wget http://yum.devopsx.com/devopsx-amazon.repo
yum install hhvm
Create a directory for the PID file to be saved
mkdir /var/run/hhvm
chown tim:tim /var/run/hhvm
chmod 755 /var/run/hhvm
Let’s modify the HHVM config, first to set the PID file correctly
vi /etc/hhvm/server.ini
Modify this line to match the directory you created above
PIDFILE="/var/run/hhvm/hhvm.pid"
Let’s put a few restrictions on HHVM to stop abuse and prevent excessive memory usage
Add the following to the end of the file. You can change your memory limit lower if you want to run MySQL on the same server, and 300 seconds is quite a long execution time so you may want to drop it lower.
memory_limit = 250M
post_max_size = 30M
upload_max_filesize = 30M
max_execution_time = 300
max_input_time = 60
Now we configure hhvm to run as our user, rather than the default “apache”, root, or anything else
vi /etc/init.d
Change the appropriate line to read as follows (note that if you created a different user you’ll have to specify that user there)
RUN_AS_USER="tim"
To hide the X-Powered-By header (which can’t help us and could help a hacker) remove it from the headers by editing the file /etc/hhvm/server.ini and adding this line
expose_php = 0
Now set HHVM to run on startup
/sbin/chkconfig --add hhvmThen restart the hhvm service.
One interesting thing I found later is a lot of warnings about timezones in the HHVM error log. This has been updated in my config files, but here’s how I fixed it – you add this to your server.ini
; Set timezone to reduce warnings and errors
date.timezone = Pacific/Auckland
HHVM Access Logs
I enabled hhvm access logs, to watch what was happening with my page caching. When I added the -v parameter and specified an access log file it looked like HHVM was being called twice from nginx. Once I enabled logging via the old .hdf method this went away and things appeared normal.
If you want hhvm access logs do the following:
- add a config.hdf file, as found in the resources section of part one of this tutorial
- change the applicable /etc/init.d/hhvm line to CONFIG_FILE=”/etc/hhvm/config.hdf”
- restart hhvm
Note that this option will disappear in the future. Another way to do it is change the /etc/init.d/hhvm file to
#ADDITIONAL_ARGS="-vLog.Access.\*.File=/var/log/hhvm/access.log"
Installing Nginx
There are three methods available to install Nginx. We need to build from source so we can include a few modules we’ll need in a later part of this tutorial, around cache purging, so I suggest you jump straight to that. The others are here for completeness, it may be helpful for other uses to have an easier Nginx install – though the build from source was relatively straightforward.
Install Nginx from the Amazon Repository
This set of commands installs the current version of nginx from the AWS repository. As at 19th Dec 2015 when I’m writing this AWS provides nginx 1.8.5, which doesn’t support http 2.0.
yum install nginx
service nginx start
chkconfig nginx on
Then open your web browser, type in your public IP and check you get the nginx welcome page showing. If not… well… do some diagnosis, or post below and I’ll see if I can help.
Install Nginx on Amazon Linux from the Nginx Repository
This gives you access to HTTP/2 and other new features. This is as per their documentation.
vi /etc/yum.repos.d/nginx.repo
Add these contents to the file (select the text, hit a in vi, right click to paste, hit esc, type “:w” (without the speech marks) then hit enter, then type “:q” to exit vi. Note that with this configuration we tell yum to look in the official nginx repository before looking in the amazon repository.
[nginx]
name=nginx repo
baseurl=http://nginx.org/packages/mainline/rhel/7/$basearch/
gpgcheck=0
enabled=1
priority=5
The following tells you what versions are available
yum --disablerepo="*" --enablerepo="nginx" list available
Then go ahead an install nginx – you have to clean out the cached package list in order for the server to find the mainline version
yum clean all
yum update
yum install nginx
service nginx start
Now browse to your server’s Elastic IP address and check that you get the nginx configuration page.
Building Nginx from Source
Update April 2017: I have a post on updating Nginx.
Update Feb 2019: I have updated the version numbers below.
This is the preferred method, and is necessary to get the modules ngx_cache_purge and headers-more-nginx-module which we need later for performance. I’ve also included instructions for the building in Google Pagespeed, but I didn’t end up using it, so take it out if you don’t want to use it. This is based on this guide to building nginx, with a few tweaks around modules and paths. Note that according to siege benchmarks using -O2 for medium compiler optimisations works better than high optimisations -O3 (no idea why) and -mtune=native does the build so that all options available on the CPU we’re running on are taken advantage of. In my initial tests this increased the transaction rate for cached pages from 1300tps to 2400tps, a huge gain.
- I run this as root, but for no good reason I did the build in the ec2-user directory. There’s probably a better location but I don’t know what it is.
- If this is on a production nginx server that’s currently running you’ll probably want to find a different way to build nginx.
- You can find the latest nginx build here, adjust the commands below as appropriate
- You can include Google PageSpeed, but I didn’t find it useful so I’ve removed it
The versions below are OUT OF date. The versions in my “updating Nginx” post (linked above) are more up to date, but you’ll probably want to check the latest version of Nginx and packages yourself to ensure you’re on the current version.
cd /home/ec2-user
mkdir nginx-build
cd nginx-build
service nginx stop
yum groupinstall "Development Tools"
yum install pcre-devel zlib-devel openssl-devel
wget http://nginx.org/download/nginx-1.15.8.tar.gz
wget http://labs.frickle.com/files/ngx_cache_purge-2.3.tar.gz
git clone https://github.com/openresty/headers-more-nginx-module.git

tar -xzf nginx-1.15.8.tar.gz
tar -xzf v0.33.tar.gz

# Safe option, slower, lots of modules included
#./configure --prefix=/etc/nginx --sbin-path=/usr/sbin/nginx --conf-path=/etc/nginx/nginx.conf --error-log-path=/var/log/nginx/error.log --http-log-path=/var/log/nginx/access.log --pid-path=/var/run/nginx.pid --lock-path=/var/run/nginx.lock --http-client-body-temp-path=/var/cache/nginx/client_temp --http-proxy-temp-path=/var/cache/nginx/proxy_temp --http-fastcgi-temp-path=/var/cache/nginx/fastcgi_temp --http-uwsgi-temp-path=/var/cache/nginx/uwsgi_temp --http-scgi-temp-path=/var/cache/nginx/scgi_temp --user=nginx --group=nginx --with-http_ssl_module --with-http_realip_module --with-http_addition_module --with-http_sub_module --with-http_dav_module --with-http_flv_module --with-http_mp4_module --with-http_gunzip_module --with-http_gzip_static_module --with-http_random_index_module --with-http_secure_link_module --with-http_stub_status_module --with-http_auth_request_module --with-threads --with-stream --with-stream_ssl_module --with-http_slice_module --with-mail --with-mail_ssl_module --with-file-aio --with-ipv6 --with-http_v2_module --with-cc-opt='-O2 -g -pipe -Wall -Wp,-D_FORTIFY_SOURCE=2 -fexceptions -fstack-protector --param=ssp-buffer-size=4 -m64 -mtune=generic' --add-module=/tmp/ngx_cache_purge-2.3 --add-module=/tmp/headers-more-nginx-module --with-http_realip_module
# Many plugins removed, extra optimisations including some JUST for the machine it's compiled on
./configure --prefix=/etc/nginx --sbin-path=/usr/sbin/nginx --conf-path=/etc/nginx/nginx.conf --error-log-path=/var/log/nginx/error.log --http-log-path=/var/log/nginx/access.log --pid-path=/var/run/nginx.pid --lock-path=/var/run/nginx.lock --http-client-body-temp-path=/var/cache/nginx/client_temp --http-proxy-temp-path=/var/cache/nginx/proxy_temp --http-fastcgi-temp-path=/var/cache/nginx/fastcgi_temp --http-uwsgi-temp-path=/var/cache/nginx/uwsgi_temp --http-scgi-temp-path=/var/cache/nginx/scgi_temp --user=nginx --group=nginx --with-http_ssl_module --with-http_realip_module --with-http_gunzip_module --with-http_gzip_static_module --with-threads --with-file-aio --with-ipv6 --with-http_v2_module --with-cc-opt='-O2 -g -pipe -Wall -Wp,-D_FORTIFY_SOURCE=2 -fexceptions -fstack-protector --param=ssp-buffer-size=4 -m64 -mtune=native' --add-module=../ngx_cache_purge-2.3 --add-module=../headers-more-nginx-module --with-http_realip_module
make && make install
make clean  (NB: optional)
service nginx start
Now that we have nginx built from source we need to exclude it from yum updates
vi /etc/yum.conf
Add these lines to the bottom of the file
## Exclude following Packages Updates ##
exclude=nginx
Starting Nginx
Copy the nginx service script from part one of our tutorial to “/etc/init.d”. Then use the following command to start nginx.
sudo service nginx start
You can also set nginx to run on startup
/sbin/chkconfig --add nginxUpgrading Nginx
I’ve posted a blog article on how to upgrade a running Nginx instance on Unix.
Nginx Configuration
Creating Folders
By default there’s no sites-enabled/sites-available by default in Nginx, so we’ll create them – but I do them with the words reversed so it’s easier to tab complete them in a shell. We’ll also set file ownership permissions
mkdir -p /etc/nginx/available-sites
mkdir -p /etc/nginx/enabled-sites
This is how you set up a symbolic link between files in these directories
ln -s /etc/nginx/available-sites/default.conf /etc/nginx/enabled-sites/default.conf
Nginx Configuration Files
Instead of telling you all the changes I’ll just give you my relatively well documented configuration files. If you can’t work out what they do from the files, or Google, ask in a comment and I’ll tell you. I suggest you back up your nginx.conf and default.conf before you start editing them. If you want best practice security consider using the Nginx config fragment from cipherli.st.
Refer to part one of this tutorial for file downloads, including my nginx.conf and website configuration files.
Google Pagespeed
I spent a fair bit of time playing with Google Pagespeed. In the end I found I didn’t need it, because adding it in only gave me a couple of percent higher scores in the Google Pagespeed scores and didn’t improve performance – possibly because I’d already spent a lot of time on performance optimization. This may be different for your WordPress theme or server, so give it a shot if you like. There are decent guides here and here.
I’m not going to go into more detail, but one of my nginx configuration files which you can download in part one of this tutorial probably has pagespeed setting still in it – the single site WordPress one perhaps.
Monit Installation on Amazon Linux / Centos (Optional)
Monit is a piece of software that checks your server and it’s software is running as it should, takes corrective action when it can, and alerts you when it can’t. Here’s how you install and configure it. Note that the AWS repository has a pretty old version of monit, and I ended up having a little trouble with it, so the preferred way to install monit is to download the latest version and follow the install instructions on the monit website.
If you decide to use the yum package manager you just do this
yum install monit
The best way to configure monit is to download the configuration file from part one of our tutorial, which takes into account the updated version we’re currently using.
vi /etc/monit.conf
hostname aws.photographerstechsupport.com  -- CHANGE THIS TO YOUR HOSTNAME
hostname  <-- CHECK IT COMES BACK the same as above
vi /etc/sysconfig/network
HOSTNAME=aws.photographerstechsupport.com
Make the appropriate section of the file look like this, but with your IP and host name
 set httpd port 2812 and
     #use address localhost  # only accept connection from localhost
     use address 10.0.1.239  # **** Your local IP, NOT your public elastic IP
     # use address aws.photographerstechsupport.com
     allow localhost        # allow localhost to connect to the server and
     allow 0.0.0.0/0.0.0.0
     allow admin:monit      # require user 'admin' with password 'monit' *** CHANGE THIS
     allow @monit           # allow users of group 'monit' to connect (rw)
     allow @users readonly  # allow users of group 'users' to connect readonly
Now set up your email format, from address, etc, in the same file
set alert [email protected]
set mail-format {
 from: [email protected]
 reply-to: [email protected]
 subject: $SERVICE $EVENT at $DATE
 message: Monit $ACTION $SERVICE at $DATE on $HOST: $DESCRIPTION.
 Yours sincerely,
 Monit
}
You need to set up a proxy pass in your nginx config so your nginx makes the monit web interface available on your public IP. Put this into any server block you like.
  location /monit/ {
    rewrite ^/monit/(.*) /$1 break;
    proxy_ignore_client_abort on;
    proxy_pass   http://aws.photographerstechsupport.com:2812;
    # proxy_redirect  https://aws.photographerstechsupport.com:2812/monit;  # From monit FAQ, didn't work for me
  }
The following rules can go into files with names as per the bold text in your /etc/monit.d/ folder (note – you can download all of these from part one of our tutorial). I’ve included monitoring of monit, though of course it can’t restart itself if it fails.
hhvm.conf
check process hhvm with pidfile /var/run/hhvm/hhvm.pid
 group hhvm
 start program = "/sbin/service hhvm start" with timeout 60 seconds
 stop program = "/sbin/service hhvm stop"

 if failed port 9001 type TCP then restart
 if mem > 400.0 MB for 1 cycles then restart
 if 5 restarts with 5 cycles then timeout

nginx.conf
check process nginx with pidfile /var/run/nginx.pid
 start program = "/etc/init.d/nginx start"
 stop program = "/etc/init.d/nginx stop"

system.conf
check system server
 if memory > 85% 2 times within 3 cycles then alert
 if cpu(user) > 75% for 2 cycles then alert
 if cpu(system) > 65% for 2 cycles then alert
mysql.conf
check process mysqld with pidfile /var/run/mysqld/mysqld.pid
 group database
 start program = "/etc/init.d/mysqld start"
 stop program = "/etc/init.d/mysqld stop"
 if failed host 127.0.0.1 port 3306 then restart
 if 5 restarts within 5 cycles then timeout
monit.conf
check process monit with pidfile /var/run/monit.pid
group monitors
mariadb.conf – NB THIS WILL END UP BLOCKING YOUR HOST FROM ACCESSING MYSQL on AWS
If you really want to monitor RDS this read this page for the settings required. What happens with this file is it hits RDS repeatedly but does log in, which causes the database server to block it to prevent it taking up database server resources.
check host RDS-MariaDB with address pts-rds1.c5lnkurep5tl.ap-southeast-2.rds.amazonaws.com
  if failed port 3306 protocol mysql with timeout 15 seconds then alert
You should also set up monit so it starts when the server is restarted
/sbin/chkconfig --add monit
Setting File Permissions
File permissions are important as they can help prevent your website being attacked, content changed, or content stolen. The following creates a new user who owns the website data, a group who can access it, and sets things up so only the right users and groups can access them.
useradd tim   (NB: you can name the user something else if you like!)
passwd tim    (NB: give them a secure password, but you'll never need to use it)
groupadd www-data
usermod -a -G www-data nginx   (add the nginx user to the www-data group)
chown -R tim /usr/share/nginx/
chgrp -R www-data /usr/share/nginx/
chmod -R 750 /usr/share/nginx/
chmod -R g+s /usr/share/nginx/
If you want to be able to FTP into the server and access the files served by nginx add the ec2-user to the www-data group
usermod -a -G www-data ec2-user
Note that you can find out which group a user is in with “groups (username)” (eg groups nginx)
Setting Amazon Linux System Timezone
This is just a handy little thing to do, it makes a few things show your local time accurately.
ls -l /usr/share/zoneinfo/        # (Find the applicable zone file)
mv /etc/localtime /etc/localtime.original
ln -s /usr/share/zoneinfo/*ZONEFILENAME* /etc/localtime
For example I use this command
ln -s /usr/share/zoneinfo/NZ /etc/localtime
Then you need to make the time zone change permanent, as Amazon describes on this page, by editing
/etc/sysconfig/clock
To contain your time zone (note – you may not want NZ, you may want “America/Los_Angeles" or similar)
ZONE="NZ"
UTC=false
Email Delivery
By default your server won’t send email notifications, but that’s easy enough to fix using an email relay like SSMTP (that’s not what it really is, but it’s what we’ll use it for). Follow the steps below to get it set up, which are mostly based on this guide. If you use FastMail you can use this setup guide, with another useful ssmtp guide here.
yum install ssmtp
usermod -a -G mail (username)    (adds you to the mail group)
alternatives --config mta    (choose SSMTP)
sendmail -V   (validate that it says something like "sSMTP 2.61 (Not sendmail at all)"
cp /etc/ssmtp/ssmtp.conf /etc/ssmtp/ssmtp.conf.orig    (this backs up the original config)
cp etc/ssmtp/revaliases /etc/ssmtp/revaliases.orig
Set up your file permissions for ssmtp – you probably want the same for revaliases.conf
sudo chown root:mail /etc/ssmtp/ssmtp.conf
sudo chmod 640 /etc/ssmtp/ssmtp.conf
Now set up the ssmtp.ini
vi /etc/ssmtp/ssmtp.conf (set up as per guide)
Make sure this following is configured
root=postmaster
mailhub=mail.yourdomain.com:587
Hostname=localhost
FromLineOverride=YES
[email protected]
AuthPass=YourPassWord
UseSTARTTLS=YES
Set up the reverse aliases
vi /etc/ssmtp/revaliases
Add the following, set up for your own details of course
root:[email protected]:mail.yourdomain.com:587
Now set up how email is rewritten
vi /root/.muttrc
Include this information
set envelope_from=yes
set from="[email protected]"
set realname="Prefer From Display"
To test this use a command like this
echo "Testing SSMTP." | mail -s 'SSMTP Test' [email protected]
Now fill in your email server details based on the setup guide I linked to above. My config is linked from the resources section of the tutorial main post. Note that I had a heck of a time getting this working and it’s still not 100%, so I have WordPress use an external SMTP server directly.
Refer to part one of this tutorial for file downloads.
Next Steps
At this point you should have a fast, reliable, secure AWS environment with Nginx, PHP using HHVM, a MySQL compatible database, a static public IP, and everything connected together and working. Read the part three of our tutorial to learn how to install and configure wordpress and all the software you’ll need to run your website.
Reference List
I used quite a few different resources to help put together this hopefully simple guide. Here’s a list of what I found most helpful.
- Installing Nginx on Centos and Amazon Linux.
- Installing HHVM on Amazon Linux.
- Nginx configuration explained and examples.
- Nginx and HTTP/2 security.
- Building Nginx with Google Pagespeed, and another page on the same topic here. Official install instructions for pagespeed module on nginx can be found here.
- Nginx performance tuning.
- Serverfault article on Linux web server permissions.
Pingback: Server Bug Fix: How to send Mails using NGINX - TECHPRPR