Introduction
This multi-part tutorial is a complete guide to setting up WordPress on AWS. In this part of our tutorial we’ll set up load testing and benchmarking, we’ll optimize the content delivery, and we’ll change DNS to take the website live.
Benchmarking was done with both ab (Apache Bench) and Siege. Significant time was spent trying to work out why different results were obtained. The key findings and discoveries were:
- Siege supports cookies. To disable this edit /etc/siege/siegerc (or similar) and add “cookies = false”
- Siege supports proxies, but the siegerc file isn’t well documented. Add “proxy-host =192.168.1.0” and “proxy-port = 1234”
- If you change anything in the siege config file you may have to include this on your siege command link (without the quotes) : “-R /etc/siege/siegerc”
- Fiddler is a great logging proxy to inspect headers. I ran Ubuntu in a local VirtualBox instance with its own IP address, ran Fiddler on my Windows PC, turned on the “allow remote computers to connect” option and I answer my performance problem question very quickly.
Links to other parts of our tutorial
- Part One, Introduction
- Part Two, Setting up AWS for WordPress with RDS, Nginx, HHVM, PHP, SSMTP
- Part Three, Migrating WordPress Sites Into AWS, including RDS Setup
- Part Four, Wordpress Website Optimization, Nginx Caching and DNS Changes to Go Live
- Part Five, Setting up HTTPS and HTTP/2 using Free Let’s Encrypt Certificates
- Part Six, Setting up CloudFlare free CDN for global caching
Page Table of Contents / Index
- Installing Siege, Benchmarking Tool
- Debugging Nginx Location Issues
- Installing Apache Benchmark, Benchmarking Tool
- Website Performance Optimization
- Nginx Fastcgi Caching
- Setting Cache Control Headers
- Hotlink protection and image caching
- Redirecting WordPress Single Site Resources (Uploads / Jpeg files) to WordPress Multisite for SEO
- Caching Analysis
- WordPress Performance Improvement with Nginx FastCGI Page Caching
- Tweaks
- Benchmarking WordPress on a t2.micro
- Benchmarking WordPress on a t2.nano
- DNS Changes to Go Live
Installing and Using Siege, Benchmarking Tool
Update, after publication. A new, useful benchmarking tools is h2load. It’s worth considering as it does http/2, but I tried it and found it impossible to install and get working.
Siege is the other load testing tool we’ll use, for testing just the performance of page loads, not including static resources (though I think it can do that). You can install it on your current instance if you like, your PC, a virtual machine on your home PC, or another AWS instance. If you use another AWS instance you may have to request an instance limit increase – it tells you how when you try to start one, but this is the ideal case for spot instances. Just spin up an m3.medium spot instance for 1-2c/hour (or so) for the time you need it. Siege takes about 2 minutes to install so there’s little overhead, and once it’s running you can take a snapshot so you can start it later even more quickly.
I ran a small test to see if the testing machine made any difference, with 50 clients:
- Ubuntu VM on home PC: 293 transactions/second
- From my existing t2.micro instance: 629tps
- From a m3.medium instance: 1076tps
So yes the testing instance does make a significant difference. I’m surprised testing from the instance itself was so low, since CPU usage was only about 8% during the test. The reason why is explained in this article, that it’s basically just latency causing the issue. If you have 50ms latency then you can only get to the server (1000 / 50 ) = 20 times per second. This means Siege is a good test to show if your changes have had an impact if testing locally, but otherwise isn’t very useful.
I also checked external bandwidth with SFTP running multiple threads: as at Jan 2016 a T2.Micro instance can easily handle 10Mbps up and 30Mbps down, which is the speed of my home internet connection. I’ve also done SCP between two instances and gotten 50Mbps. One thing I noticed though: these things can transfer a lot of data, and data transfer out of your EC2 instance is charged even if it’s to another instance, though it’s not that expensive it can add up during performance testing.
Installing Siege is pretty easy – note that I enable the Enterprize packages repository, install, then disable, as it has some newer packages than are in the Amazon repository and I don’t want to mess things up.
vi /etc/yum.repos.d/epel.repo
Change the line to read enabled=1, save and quit (may already be set from earlier work we've done)
yum install siege
Then edit your URL file
vi /etc/yum.repos.d/epel.repo
Change the line to read enabled=0 if you modified it earlier, save and quit
siege -t10s http://www.nytimes.com (run this to check it’s installed and working)
Next set up your hosts file so you can do your performance testing before you take your new server live
vi /etc/hosts
1.2.3 4 example.com (use your elastic IP and host name(s))
Now configure the URLs you want tested.
siege.config
vi /root/.siegerc   (assuming you're root)
Change these two lines as follows. The first keeps the http connections open, which doesn’t simulate real world usage but helps us load the server more. The second tells siege we’re benchmarking, not simulating real traffic.
connection = keep-alive
benchmark = true
delay = 0
Edit you URLs file, which define the pages to be tested
vi /etc/siege/urls.txt (follow the instructions provided on the URL format)
Then run siege. -c gives the number of concurrent testing threads, -t gives the testing time, -i is (internet simulation) which hits the URLs randomly, -b is benchmark mode
siege -c 50 -t5s -f /etc/siege/urls.txt -i -q -b
Here’s another example, which has 30 clients (c30), 5 requests each (r5), 1 second between requests (d1), with no time limit.
siege -c30 -r5 -d1 -f /etc/siege/urls.txt -i -q -b
You can see the results of all your tests as follows. Note that if you’re not running as root it’s probably in your home directory : /home/ec2-user
more /root/siege.log
If you happen to want to test a single URL, which can be handy for diagnosing problems with a website, you can use this. The second command is a curl to get just headers, which can be good to see if a URL is returning 301 redirects.
siege -c 50 -t5s http://example.com -i -q -b
curl -vso /dev/null http://example.com
Debugging Nginx Location Issues
If you have problems working out what’s going on Fiddler is invaluable. Set it up as a proxy on your PC, set up an Ubuntu virtual machine using VirtualBox, and watch the headers to diagnose problems. You can add headers in your Nginx locations to help work out what’s going on. For example, this helps you work out what location is being triggered for a given request by adding the Z_Location header to the response.
 # Default location to serve
 location / {
   # If the file can't be found try adding a slash on the end - it might be a directory the client is looking for.
   try_files $uri $uri/ /index.php?$args;
   more_clear_headers Server; more_clear_headers "Pragma";
   add_header Z_LOCATION "wpmu root"; add_header URI $uri; # Nginx Debugging
 }
I was trying to work out which cookie was preventing caching, this technique helped me work out which it was.
if ($http_cookie ~* "comment_author|wordpress_[a-f0-9]+|wp-postpass|wordpress_no_cache|wordpress_logged_in") {
  etc
}
set $pos1 0; set $pos2 0; set $pos3 0;
if ($http_cookie ~* "comment_author") {
  set $pos1 "comment_author cookie";
}
if ($http_cookie ~* "wordpress_[a-f0-9]+|") {
 set $pos2 "wordpress_[a-f0-9]+|cookie";
}
if ($http_cookie ~* "wordpress_logged_in") {
 set $pos3 "wordpress_logged_in cookie";
}

location ~ \.(hh|php)$ {
  (whatever is already there)
  add_header pos1 $pos1;
  add_header pos2 $pos2;
  add_header pos3 $pos3;
}
These techniques have been invaluable to help me track down issues and diagnose Nginx issues.
Installing and Using Apache Benchmark
Siege is a great benchmarking tool, but it kept giving very low scores for a few URLs. We installed Apache Benchmark to help with our diagnosis. You can find its manual here, with a description of the output. The key metric we’re interested in is transactions per second.
yum install /usr/bin/ab
Here are some sample command lines for ab
Do 1000 tests with 25 threads (ie 40 requests per thread)
ab -n 1000 -c 25 http://www.example.com/
Do one test but output all headers
ab -n 1 -c 1 -v 4 http://www.example.com/
Do 1000 tests with 25 threads using the proxy 192.168.1.10 on port 8888 (this is how I set up fiddler for debugging)
ab -n 1000 -c 25 -X 192.168.1.10:8888 http://www.example.com/
By comparing the requests and responses of AB and Siege using Fiddler we worked out what our issues were. Mostly it was cookies, but there was also a small mistake in one configuration file.
Nginx Website Performance Optimization
Nginx Page Caching with Fast_CGI
Most WordPress installs use plugins to cache the pages (among other things) and accelerate pages using caching headers. While this is a good approach for shared hosting where you have little control it still means every page request has to hit PHP, run through plugins, etc, which is relatively slow. A much faster way is to do the page caching in Nginx, which is super fast, so long as we can cater for cache flushing and not caching logged in users. This will increase our website performance, scalability, and make better use of the limited resources of our little AWS t2.micro server. We’ll test a caching plugin just to see how it compares. Nginx has a great article on microcaching which is well worth reading.
You basically just have to use the configuration file I provided, which is well commented. The key parts follow:
This part defines the nginx cache, it goes above the server block where it’s used
# Caching. Putting the cache into /dev/shm keeps it in RAM, limited to 10MB, for one day. You can move to disk if you like, or extend the caching time
#fastcgi_cache_path /etc/nginx/cache levels=1:2 keys_zone=WORDPRESS:10m inactive=1440m; #Disk
fastcgi_cache_path /dev/shm/nginxcache levels=1:2 keys_zone=WORDPRESS:10m inactive=1440m; #RAM
# This is to do with how the files are laid out on disk
fastcgi_cache_key "$scheme$request_method$host$request_uri";
# Determines in which cases a stale cached response can be used when an error occurs during communication with the FastCGI server
fastcgi_cache_use_stale error timeout invalid_header http_500;
# WordPress themes (especially Photocrati) often send back inappropriate headers, so ignore them
fastcgi_ignore_headers Cache-Control Expires Set-Cookie;
This part goes inside the server block. It’s evaluated on each request to decide if the request should be cached or not.
 # Rules to work out when cache should/shouldn't be used
 set $skip_cache 0;
 # POST requests and urls with a query string should always go to PHP
 if ($request_method = POST) {
 set $skip_cache 1;
 }
 if ($query_string != "") {
 set $skip_cache 1;
 }
 # Don't cache uris containing the following segments
 if ($request_uri ~* "/wp-admin/|/xmlrpc.php|wp-.*.php|/feed/|index.php|sitemap(_index)?.xml") {
 set $skip_cache 1;
 }
 # Don't use the cache for logged in users or recent commenters. The top line is what most people use, but
 # based on my analysis I'm currently using the second uncommented line and it seem to work just fine.
 #if ($http_cookie ~* "comment_author|wordpress_[a-f0-9]+|wp-postpass|wordpress_no_cache|wordpress_logged_in") {
 if ($http_cookie ~* "comment_author|wordpress_[a-f0-9]+|wordpress_logged_in|wp-cron") {
   set $skip_cache 1;
 }
This part creates a URL that clears the cache when it’s called. Note that I put this into every server block, especially the one that runs the master WordPress Multisite directory, mostly because I haven’t worked out the details yet
# This creates a URL that is called by the nginx helper plugin to clear the cache when required
location ~ /purge(/.*) {
 fastcgi_cache_purge WORDPRESS "$scheme$request_method$host$1";
 access_log on;
}
This is the location that runs PHP using HHVM. The second half tells it when to use the nginx fastcgi cache.
# Send HipHop and PHP requests to HHVM
location ~ \.(hh|php)$ {
 fastcgi_keep_conn on;
 fastcgi_intercept_errors on;
 fastcgi_pass php;
 include fastcgi_params;
 fastcgi_param SCRIPT_FILENAME $document_root$fastcgi_script_name;
 # Use the cache defined above. Cache 200 (success) status's for 24 hours, and other error response codes for
 # an hour. This will help mitigate high loads which could effective denial of service attack PHP / HHVM.
 # Only cache GET and HEAD requests
 fastcgi_cache WORDPRESS;
 fastcgi_cache_valid 200 1440m;
 fastcgi_cache_valid 403 404 405 410 414 301 302 307 60m;
 fastcgi_cache_methods GET HEAD;
 fastcgi_cache_bypass $skip_cache;
 fastcgi_no_cache $skip_cache;
 add_header X-Cache $upstream_cache_status;
}
Clearing the FastCGI Cache
Nginx is smart enough to cache things, but the open source version doesn’t clear the cache based on POSTs – ie changing pages in WordPress. It does time cached pages out however you set it up, but we really want the appropriate parts of the cache purged when we update the site. I originally tried the WordPress Plugin Nginx Helper to do this but I could never get it working. Instead the plugin Nginx Cache seems to work just fine on both single and multisite, and the only configuration is giving it the path of your cache, which is done in WordPress Admin -> Tools -> Nginx. I suggest you configure this for every site in your network, or all of your single site installs.
The best way to get this plugin is from git, as it has the latest updates, with the github project here. Run this command, making sure
cd /var/www/wordpress/wp-content/plugins/
git clone https://github.com/tillkruss/Nginx-FastCGI-Cache.git
But of course nothing is that simple, if you consider 4 hours effort simple. It took me many hours to work out why the “purge cache” button wouldn’t work – it’s because the cache is created by nginx with 700 permissions (ie no-one else can read or delete the file), and the plugin runs as the hhvm user (which we’ve set up as a new user, “tim” in my case). The only solution that I could find that works (which took me many hours to find) is to create a cron job that changes the permissions to 777, which I run hourly because I figure that’s probably good enough (NB: I later changed it to a crontab that’s run every 5 minutes so that the cache can be purged if you’re doing intensive work – Google crontab 5 minutes). You can always define a custom cron job to run as often as you like, this page says how. 777 isn’t generally a good permission to give anything, but given this cache only contains public information and it’s unlikely anyone can read it directly anywway I think it’s ok in this case.
vi /etc/cron.hourly/nginx_cache_dir_permissions
Paste the following in
#!/bin/bash
if [ -d "/dev/shm/nginxcache" ]; then
 chmod -R 0777 /dev/shm/nginxcache
fi
We now have Nginx set up to do super fast caching of all php files for us, with purging!
Photocrati Dynamic Style Caching with Nginx
Photocrati is a great theme, but it’s not set up well for caching or performance. I can see that when I switch from the WordPress default theme to Photocrati headers that prevent caching appear, but I can’t work out why and fix it in the PHP, so I’ll fix it in Nginx. I also noticed that if caching is turned on, and I have more than one Photocrati website on the same WPMU install the websites look and feel get mixed up. The following caches the dynamic style, which is really quite static once things are set up.
# Photocrati dynamic styles should be cached by Nginx and by the browser.
# This is a special case that not everyone will need
location = /wp-content/themes/photocrati-theme/styles/dynamic-style.php {
 fastcgi_keep_conn on;
 fastcgi_intercept_errors on;
 fastcgi_pass php;
 include fastcgi_params;
 fastcgi_param SCRIPT_FILENAME $document_root$fastcgi_script_name;
 # Use the cache defined above. Cache only 200 (success) status's, for 24 hours
 fastcgi_cache WORDPRESS;
 fastcgi_cache_valid 200 1440m;
 add_header X-Cache $upstream_cache_status;
 # Remove headers we don't need. Add cache control header for this particular file
 more_clear_headers "Pragma"; more_clear_headers Server;
 add_header Cache-Control "public";
 expires 4h;
 access_log on;
}
Setting Cache Control Headers
Cache control headers tell the browser and any proxy servers between the server and the browser what they can cache and how long for. This avoids the user having to request pages all the way from our server if they already have them, or if a proxy has them. We generally want all our static resources cached for quite a while, and some pages cached for a short to moderate time, though revalidating pages on each view can be prudent for sites that change regularly. This is CRITICAL to good website performance, especially when working with a CDN.
We use a couple of different techniques to set cache control headers. First off we clear out any existing headers, like the very old Pragma which is not useful any more, clearing Expires headers (which is probably pointless since we set them later), and we clear the Server name for security.
more_clear_headers "Pragma"; more_clear_headers Server; more_clear_headers "Expires";
Then we can set the header manually. For image we use quite a long expires time
add_header Cache-Control "public, max-age=691200, s-maxage=691200";
For pages we keep it shorter – many sites will need this much shorter
add_header Cache-Control "public, max-age=86400, s-maxage=86400";
In some places we use an alternative format, for convenience.
expires 8d;
Setting proper caching headers is really critical to caching, so it’s worth spending some time on.
Image Caching and Hotlink Protection
This first location block sets up cache control headers for images so it can be cached by proxy servers, an expiry of 8days. Note that I stopped this running for ico files as I have something tricky working on those below. This also adds hotlink protection – just upload any file you like to the same directory as your wp-config.php file.
# Don't log errors finding static resources, and optionally set the expires time to maximum
# NB I removed ICO so I could redirect favicon below - longer string therefore location matched
# location ~* \.(jpg|jpeg|png|gif|css|js|ico)$ {
location ~* \.(jpg|jpeg|png|gif|css|js)$ {
 log_not_found off; access_log off;
 add_header Cache-Control "public";
 expires 8d;
 more_clear_headers Server; more_clear_headers "Pragma";

 valid_referers none blocked server_names ~($host) ~(googleusercontent|google|bing|yahoo);
  if ($invalid_referer) {
  rewrite (.*) /stop-stealing-images.png redirect;
  # drop the 'redirect' flag for redirect without URL change (internal rewrite)
  }
 }
 location = /stop-stealing-images.png { }
Best Favicon Method for WordPress Multisite with Nginx
This is the best way I’ve found to deal with favicons under Nginx. Intead of using a plugin that includes a reference to it in the page source this puts favicon.ico onto the domain root where it’s expected. This is better because whenever a browser requests even a single resource from a domain it requests the favicon.
Note that if you have the mapping block already don’t add it again.
# WordPress Multisite using domains
# From https://www.nginx.com/resources/wiki/start/topics/recipes/wordpress/
# Ref: http://wordpress.org/extend/plugins/nginx-helper/
 map $http_host $blogid {
 default -999;
 photographerstechsupport.com 2;
 www.photographerstechsupport.com 2;
 example.com 5;
 www.example.com 5;
}
# This redirects all calls for favicon to the site subdirectory for the blog in question
# It uses the code at the top of this file to work out the blog ID
location /favicon.ico {
 alias /usr/share/nginx/html/wordpress/wp-content/uploads/sites/$blogid/favicon.ico;
 access_log off; log_not_found off;
 add_header Cache-Control "public";
 expires 7d;
 more_clear_headers Server; more_clear_headers "Pragma";
 add_header Z_LOCATION "favicon.ico"; add_header URI $uri; # DEBUG
}
Splitting Nginx Config Files and Moving the Files
My Nginx config files were getting pretty big at this point, so I moved each server into its own config file in the available-sites directory and set up symbolic links. If you’ve followed the whole tutorial this should be pretty trivial to do. If you haven’t followed the whole tutorial and can’t work this out go back to the start of part one and read up, or just download the files from part one of the tutorial.
Redirecting WordPress Single Site Resources (Uploads / Jpeg files) to WordPress Multisite for SEO
When we move our WordPress single site installs to multisite the images move. Returning 404 “not found” errors isn’t great for SEO, so we’ll redirect them. This took me quite a few hours to work out, but it was quite interesting learning about regular expressions and capture groups.
# WordPress Multisite using domains
# From https://www.nginx.com/resources/wiki/start/topics/recipes/wordpress/
# Ref: http://wordpress.org/extend/plugins/nginx-helper/
map $http_host $blogid {
 default -999;
 photographerstechsupport.com 2;
 www.photographerstechsupport.com 2;
 example.com 5;
 www.example.com 5;
}
# We want all resources in the wp-content/uploads/20x and uploads/galleries folders
# to redirect to wp-content/uploads/sites/$blogid/whatever
location ~* "wp-content\/uploads\/((\d{4,}\/\d{2,}|galleries).*)" {
 # alias /usr/share/nginx/html/wordpress/wp-content/uploads/sites/$blogid/$1;
 add_header Z_LOCATION "OLD IMAGE REDIRECT URL";
 add_header URI $uri; # DEBUG
 return 302 $scheme://$host/wp-content/uploads/sites/$blogid/$1; # You probably want a 301 there after you've done testing
}
Fixing a Problem
At one point I changed permissions carelessly and got the following error in my nginx logs. It manifested that forced reloads wouldn’t load some css resources.
[crit] 2491#2491: *1 open() "/var/cache/nginx/fastcgi_temp/1/00/0000000001" failed (13: Permission denied) while reading upstream, client: 111.69.x.x, server: photographerstechsupport.com, request: "GET /wp-admin/load-styles.php?c=0&dir=ltr&load=dashicons,admin-bar,wp-admin,buttons,wp-auth-check&ver=4.4 HTTP/1.1", upstream: "fastcgi://127.0.0.1:9001", host: "photographerstechsupport.com", referrer: "http://photographerstechsupport.com/wp-admin/index.php"
Fortunately I had an EBS snapshot and I was able to roll back, but I did mange to fix it eventually. The problem was folder permissions – they need to be set up like this
drwxr-xr-x 21 root root 4096 Dec 19 06:58 /var
drwxr-xr-x 8 root root 4096 Dec 18 18:43 /var/cache
drwxr-xr-x 7 nginx root 4096 Dec 18 18:45 /var/cache/nginx
drwx------ 2 nginx root 4096 Dec 31 02:47 /var/cache/nginx/client_temp
drwx------ 12 nginx root 4096 Dec 27 04:09 fastcgi_temp
drwx------ 2 nginx root 4096 Dec 18 18:45 proxy_temp
drwx------ 2 nginx root 4096 Dec 18 18:45 scgi_temp
drwx------ 2 nginx root 4096 Dec 18 18:45 uwsgi_temp
EBS snapshots really saved me on this one.
Caching Analysis
Here’s the contents of my nginx access log, a long way through optimization. This is loading a Photocrati website, then hitting reload. We can see that most of the things are cached, but the “display_gallery_iframe” isn’t initially. A couple of tweaks to our nginx rules and everything is cached. This works because I know these websites rarely change, and if it takes an hour or a day for the new contents to be available, that’s fine. Of course we can flush caches manually if we want our content live immediately.
Here’s the rule we put in to cope with this situation.
 # Exception for Photocrati loading Google fonts and gallery iframes
  if ($query_string ~* "(load_google_fonts|display_gallery_iframe)") {
  set $skip_cache 0;
 }
ORIGINAL
(client IP) - - [25/Jan/2016:11:12:54 +1300] "GET / HTTP/1.1" 200 11673 "-" "-" "0.135" "MISS"
(client IP) - - [25/Jan/2016:11:12:55 +1300] "GET /?load_google_fonts&family=Open+Sans|Open+Sans:300|Open+Sans:bold|Open+Sans:100|Playfair+Display HTTP/1.1" 200 403 "http://www.example.com/" "-" "0.000" "HIT"
(client IP) - - [25/Jan/2016:11:12:55 +1300] "GET /wp-content/themes/photocrati-theme/styles/dynamic-style.php HTTP/1.1" 200 11746 "http://www.example.com/" "-" "0.000" "HIT"
(client IP) - - [25/Jan/2016:11:12:56 +1300] "GET /index.php?display_gallery_iframe&gal_id=49_1&gal_type=1&gal_cap=OFF&gal_page=true&page_template=false&bg=faf7fa HTTP/1.1" 200 2869 "http://www.example.com/" "-" "0.079" "BYPASS"
(client IP) - - [25/Jan/2016:11:13:10 +1300] "GET /index.php?display_gallery_iframe&gal_id=49_1&gal_type=1&gal_cap=OFF&gal_page=true&page_template=false&bg=faf7fa HTTP/1.1" 200 2869 "http://www.example.com/" "-" "1.096" "BYPASS"

RELOAD
(client IP) - - [25/Jan/2016:11:13:13 +1300] "GET / HTTP/1.1" 200 11673 "http://www.example.com/" "-" "0.000" "HIT"
(client IP) - - [25/Jan/2016:11:13:13 +1300] "GET /?load_google_fonts&family=Open+Sans|Open+Sans:300|Open+Sans:bold|Open+Sans:100|Playfair+Display HTTP/1.1" 200 403 "http://www.example.com/" "-" "0.000" "HIT"
(client IP) - - [25/Jan/2016:11:13:13 +1300] "GET /wp-content/themes/photocrati-theme/styles/dynamic-style.php HTTP/1.1" 200 11746 "http://www.example.com/" "-" "0.000" "HIT"
(client IP) - - [25/Jan/2016:11:13:14 +1300] "GET /index.php?display_gallery_iframe&gal_id=49_1&gal_type=1&gal_cap=OFF&gal_page=true&page_template=false&bg=faf7fa HTTP/1.1" 200 2869 "http://www.example.com/" "-" "0.099" "BYPASS"
(client IP) - - [25/Jan/2016:11:13:14 +1300] "GET /wp-content/themes/photocrati-theme/styles/dynamic-style.php HTTP/1.1" 200 11746 "http://www.example.com/index.php?display_gallery_iframe&gal_id=49_1&gal_type=1&gal_cap=OFF&gal_page=true&page_template=false&bg=faf7fa" "-" "0.000" "HIT"

AFTER ADDING CACHE INSTRUCTION
(client IP) - - [25/Jan/2016:11:23:15 +1300] "GET / HTTP/1.1" 200 11673 "http://www.example.com/landscape/" "-" "0.000" "HIT"
(client IP) - - [25/Jan/2016:11:23:15 +1300] "GET /?load_google_fonts&family=Open+Sans|Open+Sans:300|Open+Sans:bold|Open+Sans:100|Playfair+Display HTTP/1.1" 200 403 "http://www.example.com/" "-" "0.000" "HIT"
(client IP) - - [25/Jan/2016:11:23:15 +1300] "GET /wp-content/themes/photocrati-theme/styles/dynamic-style.php HTTP/1.1" 200 11746 "http://www.example.com/" "-" "0.000" "HIT"
(client IP) - - [25/Jan/2016:11:23:16 +1300] "GET /index.php?display_gallery_iframe&gal_id=49_1&gal_type=1&gal_cap=OFF&gal_page=true&page_template=false&bg=faf7fa HTTP/1.1" 200 2869 "http://www.example.com/" "-" "0.000" "HIT"
(client IP) - - [25/Jan/2016:11:23:16 +1300] "GET /wp-content/themes/photocrati-theme/styles/dynamic-style.php HTTP/1.1" 200 11746 "http://www.example.com/index.php?display_gallery_iframe&gal_id=49_1&gal_type=1&gal_cap=OFF&gal_page=true&page_template=false&bg=faf7fa" "-" "0.000" "HIT"
Lots of Little Tweaks
- For the favicon I created a new location inside the nginx site config, which refers to the $blogid defined at the start of the file. Refer to the final configs posted in part one.
- To hide that we’re using nginx we add the following to each location: more_clear_headers Server;
- To remove the outdated Pragma caching header (from HTTP/1.0) we add the following to each location: more_clear_headers “Pragma”;
- I got tired of typing /usr/share/ (etc) to get to my webroot, so I moved everything to /var/www/wordpress . It was fairly trivial to set up the permissions again and change the nginx config.
Benchmarking WordPress
Now that we’ve done all that it’d be a good time to benchmark WPMU without any optimisations, with browser caching turned on, with fastcgi caching, and with nginx caching. For this we’re going to use Siege. JMeter would be a much better real world test than Siege, as it download web pages and all associated resources while respecting caching headers, but we know serving static resources is fast and easy so we’ll concentrate on the active pages.
I found a few interesting things while bench-marking:
- Make sure to use the full URL, including trailing slash where appropriate. You can check for 301 redirects using Firefox and “Live HTTP Headers“. I discovered things were registering as slower than expected because I only had caching for pages set up, not for error codes like 404.
- By going through URL by URL for a half dozen sample URLs from each website using Siege and 5 second tests I found a subset of pages that were slow. This let me diagnose the problems and work them out.
- Increasing the number of clients didn’t increase the throughput, even though nginx CPU usage rarely goes over a few percent. I assume this is because of the limited network performance of the t2.micro instance. One day I may launch it as a larger instance to test that theory out.
- Performance testing from the instance, to the instance, gave results about the same as going via CloudFlare. Testing from another instance increased performance between 50% and 100%. Since CPU usage was low the network traffic limit is probably the bottleneck.
- Siege and Apache Benchmark usually gave approximately the same results, with Siege usually reporting higher numbers. This is probably because it uses HTTP/1.1 which includes keepalives, whereas ab uses HTTP/1.0.
Here’s the results of my benchmarking. Note that it hits the nginx cache when it’s turned on, so that’s all we’re really testing. Testing was done from an m4.xlarge, which has “high” network throughput.
| Description | Trans per sec | Latency (ms) |
|---|---|---|
| No Cache, From Web Server | 11 | 860ms |
| No Cache, From Spot Instance | 11 | 860ms |
| With Cache, From Web Server | 472 | 20ms |
| With Cache, From Spot Instance | 1134 | 10ms |
| With Cache, From Spot Instance, via CloudFlare | 1604 | 20ms |
| Serving Static HTML files, http, testing from web server | 440 | 10ms |
| Serving Static HTML files, https, testing from web server | 166 | 145ms |
As expected the Nginx fast cgi cache increased performance massive – our transactions per second increased by 4000% and our latency reduced by 98%. The load on the web server (the HHVM process that runs PHP) dropped from around 50% to around 1%. It also shows that if we have logged in users we’re getting 11 pages per second generated, which is enough for a lowly loaded website, but not enough for a website that gets a lot of logged in users. If that was the case more optimization would be needed, and probably larger instances sizes. The larger instances have better network throughput, and some types (M, but not T) come with directly attached instance storage which could really accelerate anything that can be cached on that storage.
Here’s the output of “free”, which shows how memory is being used
            total    used   free shared buffers cached
Mem:              1019452 788768 230684  29440  93372  170748
-/+ buffers/cache: 524648 494804
Here’s the memory usage from top
PID  USER    PR NI VIRT   RES  SHR S %CPU %MEM    TIME+  COMMAND
19613 user   20 0 1274m  334m  29m S 0.0  33.6 15:39.52 hhvm
26702 nginx  20 0 304m    16m  10m S 0.0   1.6 0:01.72  nginx
26703 nginx  20 0 302m    11m  8224 S 0.0  1.1 0:00.01  nginx
25374 root   20 0 115m   6976  5908 S 0.0  0.7 0:00.01  sshd
25509 root   20 0 115m   6736  5668 S 0.0  0.7 0:00.01  sshd
26700 root   20 0 294m   4932  1976 S 0.0  0.5 0:00.00  nginx
This shows that HHVM is taking 33% of the system memory (336MB), nginx is taking 3.2% (32MB), and nothing else really takes much else. The rest is taken up bu caches and buffers, which are used to improve performance. This suggests that the system has plenty of RAM to run MySQL if we decide to move it out of RDS when our free tier runs out.
All in all the performance of the system is easily good enough for what we need, for running a few low to moderate volume websites where few people are logged in.
Benchmarking WordPress on a t2.nano
We later switched to a t2.nano, when the free tier ran out. Here’s the results of a siege benchmark from an Ubuntu 16.04 m3.medium instance
| Description | Trans per sec | Latency (ms) |
|---|---|---|
| Nginx Page Caching On | 249 | 200ms |
| Nginx Page Caching Off | 11.3 | 440ms |
Basically all the CPU is used by Nginx when page caching is on, and by PHP when page caching is off – as you’d expect.
WordPress Performance With Nginx FastCGI Page Caching
I ran a quick test on one wordpress install with page caching on and off. WordPress uses Photocrati, which dynamically generates CSS, so I’ve cached this in the Nginx page cache. Testing was done using webpagetest.org, which tests loading the page and all resources. I ran 9 tests from Wellington, New Zealand, which has approx 220ms ping to the source server, but has only a 10ms ping to the nearest CloudFlare data centre in Auckland.
Page load time without page caching: 2.549s
Page load time with page caching: 1.708s
This is a 33% improvement with a simple web server configuration – an easy win!
DNS Changes to Go Live
This one is going to be different for everyone, but the concept is quite simple – you need to change your A or CNAME record for each domain you’re moving to the elastic IP you have your server running on. 24 hours before you plan to do your migration change your DNS record TTL down to a low value like 300 seconds, so your migration will happen reasonably quickly. Not everyone respects this TTL, so beware it could take 24 hours. TTL Time To Live, essentially how long DNS records are cached for across the internet.
Security Note: Note that there are often a lot of junk DNS records lying around, which often don’t help and can give away the IP address of your server. One advantage of a CDN is it prevents denial of service attacks, but if an attacker can find your IP address the CDN can’t help you. If you’re using a CDN it’s best to delete any DNS records that you don’t absolutely need – mail.example.com, localhost, ftp.domain.com, etc. A CDN proxies your requests so your clients will never know the IP address of your origin server.
IMPORTANT NOTE regarding email: we haven’t set up an email server on this server, so you’ll either have to work that out yourself or (a better option) host your email somewhere else. I have my email hosted on FastMail, I find them excellent in terms of performance and value ($5/year + $10/year per lite account / domain), but Google Apps (a paid version of Gmail for business) is more popular ($5/month/account). You set up email by changing your MX records. Email migration is a service we offer, if you have any trouble you can contact us for help.
There are probably hundreds of different interfaces to change DNS, so there’s no point me trying to cover that. I suggest you use Goggle to search for “How to change DNS records Godaddy”, or whatever you need.
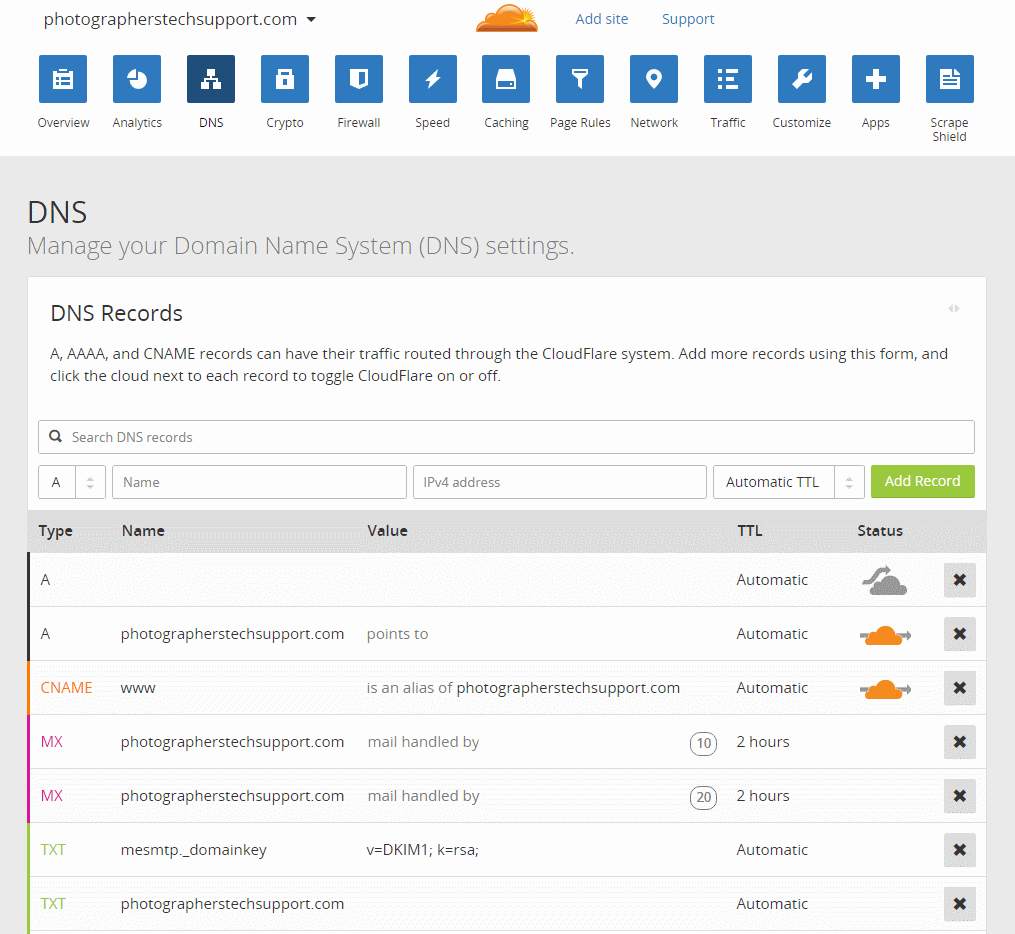
Here’s an example of my DNS setup, in CloudFlare. Click to make it larger.
Next Steps
At this point you should a fast, well optimized WordPress server running on your AWS instance, and you could easily go live at this point. Read part five of our AWS/WordPress tutorial to learn how to add https and HTTP/2 to your website to secure and accelerate your website.
Reference List
I used quite a few different resources to help put together this hopefully simple guide. Here’s a list of what I found most helpful.
- Nginx WordPress Optimisations (note that their caching didn’t appear to be all that effective, but then again I may have done it incorrectly).
- Let’s Encrypt basic instructions.
- HTTP/2 on Nginx.
- Nginx configuration explained and examples.
- Let’s Encrypt SSL on Nginx.
- Nginx and HTTP/2 security.
- A great regular expression tester
Pingback: Why I Hosted WordPress on AWS & LEMP | CreateStuff