Introduction
This multi-part tutorial is a complete guide to setting up WordPress on AWS. This part of our tutorial helps set up Amazons RDS (Relational Database Service) as required for WordPress, install Wordpress, optionally install WordPress Multisite, and import your current WordPress site into WordPress single or multi site.
Links to other parts of our tutorial
- Part One, Introduction
- Part Two, Setting up AWS for WordPress with RDS, Nginx, HHVM, PHP, SSMTP
- Part Three, Migrating WordPress Sites Into AWS, including RDS Setup
- Part Four, Wordpress Website Optimization, Nginx Caching and DNS Changes to Go Live
- Part Five, Setting up HTTPS and HTTP/2 using Free Let’s Encrypt Certificates
- Part Six, Setting up CloudFlare free CDN for global caching
Page Table of Contents / Index
- RDS Database Setup
- Install WordPress
- Setting WordPress File Permissions
- Importing a Website into WordPress Single Site
- Setting up WordPress Multisite
- Import an existing website into WordPress Multisite
- A Better WordPress Cron
RDS WordPress Database Setup
Your database was set up by the RDS wizard, so the first thing to do is create a user with only the necessary privileges and grant them access to the database. First work out the private IP address of your instance by running ifconfig
ifconfig
eth0 Link encap:Ethernet HWaddr 06:1D:3C:FB:78:33
 inet addr:10.0.1.239 Bcast:10.0.1.255 Mask:255.255.255.0
 inet6 addr: fe80::41d:3cff:fefb:7833/64 Scope:Link
 UP BROADCAST RUNNING MULTICAST MTU:9001 Metric:1
 RX packets:111897 errors:0 dropped:0 overruns:0 frame:0
 TX packets:55538 errors:0 dropped:0 overruns:0 carrier:0
 collisions:0 txqueuelen:1000
Log into the database using a command like this. The URL and username come from the AWS RDS screen instance details
mysql -h something.rds.amazonaws.com -u USERNAME -p
Note that if you need to create another database at some time, for another use, or if the database isn’t created for you use something like this
CREATE DATABASE dbname;
use dbname;
Create the wordpress user – note that you need to replace PRIVATE_IP_HERE with the IP address you got from ifconfig above
CREATE USER '***wordpressuser'@'***PRIVATE_IP_HERE' IDENTIFIED BY '***INSERT_PASSWORD_HERE';
GRANT SELECT, INSERT, UPDATE, DELETE, CREATE ON ***INSERT_DATABASE_NAME_HERE.* TO '***wordpressuser'@'***PRIVATE_IP_HERE' IDENTIFIED BY '***INSERT_PASSWORD_HERE';
FLUSH PRIVILEGES;
If you already created the user and just need to grant privileges use this command
GRANT SELECT, INSERT, UPDATE, DELETE, CREATE ON INSERT_DATABASE_NAME_HERE.* TO 'wordpressuser'@'PRIVATE_IP_HERE' IDENTIFIED BY 'INSERT_PASSWORD_HERE';
If you have any problems installing WordPress, try granting all privileges instead of the list, though you’ll probably want to revoke many of them later – there’s a list here.
GRANT ALL PRIVILEGES ON INSERT_DATABASE_NAME_HERE.* TO 'wordpressuser'@'PRIVATE_IP_HERE' IDENTIFIED BY 'INSERT_PASSWORD_HERE';
If you can’t remember your database name or username go into the RDS Dashboard, choose instances, click on the drop-down beside your database instance, then choose the icon that looks like a magnifying glass over a piece of paper. It should look something like this.
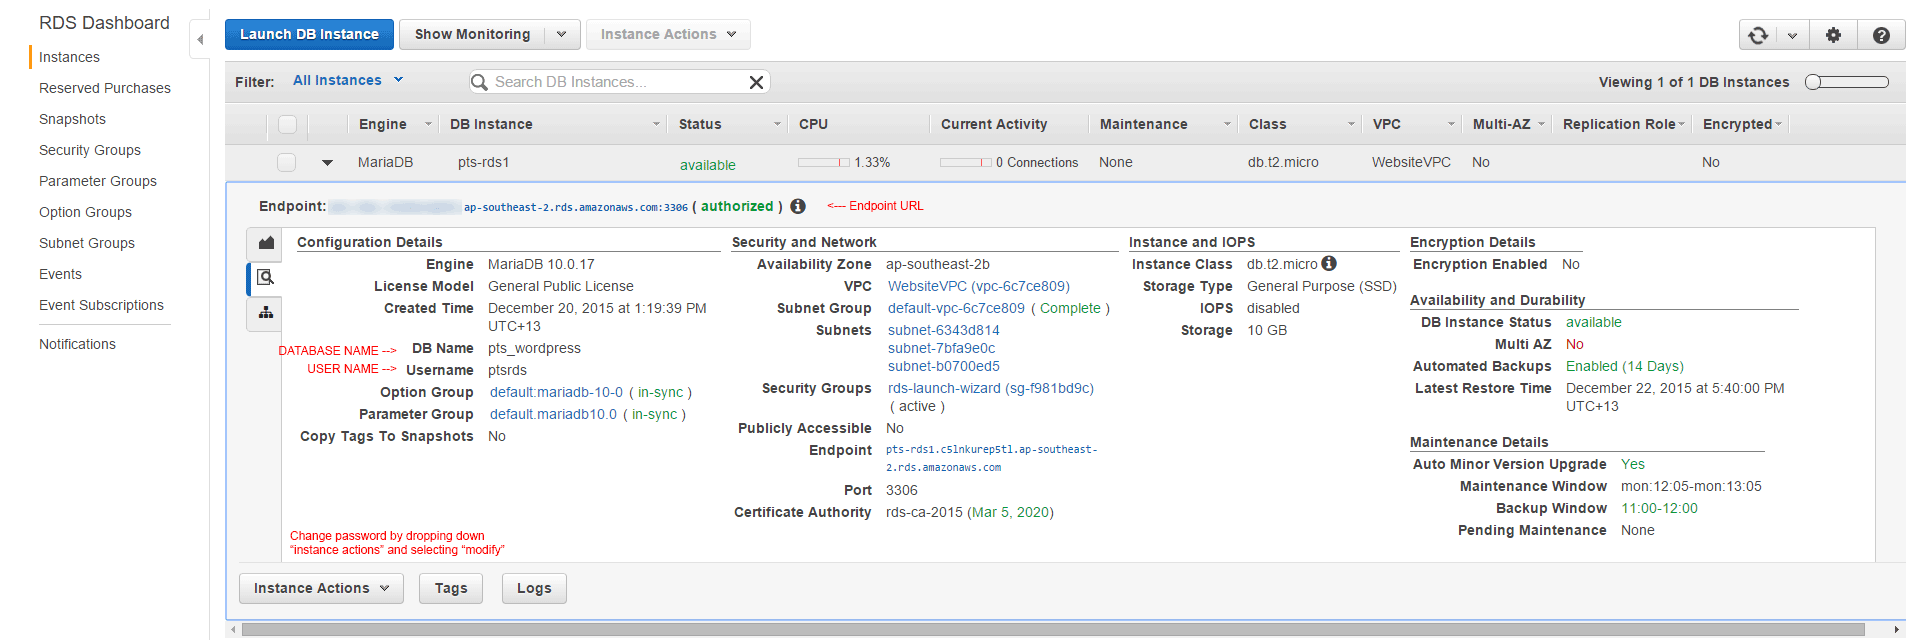
Click to enlarge
Here are some useful MySQL commands:
- SELECT User FROM mysql.user GROUP BY User; (NB: shows users on the database)
- SHOW GRANTS for ‘username’@’localhost’; (NB: shows user permissions, note that you may need to replace ‘localhost’ with your EC2 private IP)
- REVOKE ALL ON databasename.* FROM ‘username’@’localhost’; (NB: revokes user permissions)
- GRANT SELECT, INSERT, UPDATE, DELETE, CREATE ON database.* TO ‘username’@’localhost’;
Install WordPress
Go straight to the source for this one – the WordPress 5 minute install guide. You’ll need to follow “Step 1: Download and Extract”, then “Step 3: Set up wp-config.php”, “Step 4: Upload the files”, “Step 5: Run the Install Script”. In the WordPress config just plug in the information we set up above – database, database user, database password, and database URL.
The only thing slightly tricky is database connectivity, which we covered in part two of our tutorial. If you have trouble go back and read that. Any problems are generally with security groups or MySQL permissions, which seem to be pretty odd – I lost count of the number of times I got that wrong, and I have all kinds of weird, non-working grants in my database that I’ll probably have to deal with one day.
When you’re done with the setup upload one image to the WordPress media library so that we can create directory permissions required.
Setting WordPress File Permissions
File permissions are important to secure your WordPress install, and are a surprisingly complex topic. There’s a massive amount of misinformation online, even on websites with a good reputation like stack overflow. Because of this I’ve relied on the information on the WordPress website itself, who have useful information on WordPress file permissions as well as information on hardening WordPress. What I write below may still be incorrect, but at least it’s based on reputable information.
Key to what we’re about to do is this from WordPress: “Typically, all files should be owned by your user account on your web server, and should be writable by that account. Any file that needs write access from WordPress should be owned or group-owned by the user account used by the WordPress. Typically, all core WordPress files should be writable only by your user account”.
The keys here are (in order):
- set owner to the user you created earlier, and group ownership to www-data
- Folder default is 755, standard
- File default is owner writable, readable by everyone
- Uploads folder writable by user and web server, so media can be uploaded by users
- Plugins folder writable by user and web server, so plugins can be added
- Themes folder only modifiable by owner
chown -R tim /usr/share/nginx/
chgrp -R www-data /usr/share/nginx/
find /usr/share/nginx/html/wordpress -type d -exec chmod 755 {} \;
find /usr/share/nginx/html/wordpress -type f -exec chmod 644 {} \;
find /usr/share/nginx/html/wordpress/wp-content/uploads -type f -exec chmod 664 {} \;
find /usr/share/nginx/html/wordpress/wp-content/plugins -type f -exec chmod 664 {} \;
find /usr/share/nginx/html/wordpress/wp-content/themes -type f -exec chmod 644 {} \;
chmod 440 /usr/share/nginx/html/wordpress/wp-config.php (NB: restrict access to this information as much as possible)
chmod -R g+s /usr/share/nginx/html/wordpress/ NB: this should make new directories take on permissions already defined
I’ve made this into a script I can run to reset permissions for all my sites back to a known state, which comes in handy.
Importing a Website Into WordPress Single Site
The two main approaches to importing WordPress are to copy the whole database and all folders over to the new host, or to set it up from scratch, creating new users, the importing the content. I tried to copy all the files and the database but I got odd errors – Wordress ran and I could log in but I couldn’t access the admin interface. Rather than spend a long time workout out why I just set it up from scratch and imported the content in.
Here are the main steps to this approach
- Install WordPress fresh, get it going and log in
- Copy over your uploads folder, and any other folders you have that may be custom. For example Photocrati has uploads/galleries which needs to be copied over
- Install your desired theme, and activate it
- Install any plugins that create database table (contact form 7, contact form DB, etc)
- Export the database from the old server, import into the new server. Make sure not to export the following tables: wp_pts_options, wp_pts_users, wp_pts_user_meta, wp_pts_redirects, wp_pts_wf* (Wordfence), wp_pts_hooklist, wp_pts_cf* (contact form 7), wp_pts_ak*, or anything plugins create unless you can’t recreate it easily. Not taking wp_pts_options means you’ll have to do a bunch of setup (blog name, permalink format, etc), but it seems more reliable.
- If you run Photocrati the the only tables you need to move over for your galleries are the photocrati_galleries and photocrati_gallery_ids tables.
- Import the exported data into the new database
To export your old database you can use something like this from a shell, or you can use PHPMyAdmin. If you use PHPMyAdmin tell it to export the data, not the schema, as you want to use the latest WordPress schema.
mysqldump -h (dbname).rds.amazonaws.com -u (username) -p (databasename) > backupfilename.sql
To create the new database and import your data follow these steps.
Connect to MySQL
mysql -h ***RDS_URL.rds.amazonaws.com -u ***USER -p
Create your database and user – I don’t know why you have to specify the password for the user and the grant, but you seem to have to.
CREATE DATABASE ***INSERT_DATABASE_NAME_HERE;
use ***INSERT_DATABASE_NAME_HERE;
CREATE USER '***USER'@'***PRIVATE UP HERE' IDENTIFIED BY '***PASSWORD_HERE'; GRANT SELECT, INSERT, UPDATE, DELETE, CREATE ON ***INSERT_DATABASE_NAME_HERE.* TO '***USER'@'***PRIVATE_IP_HERE' IDENTIFIED BY '***PASSWORD_HERE';
FLUSH PRIVILEGES;
Import the data you exported from your old WordPress host
mysql -h (dbname).rds.amazonaws.com -u (username) -p (databasename) < datafile.sql
Make sure to edit wp-config.php with the new values for database name, database user, database password, and database URL. Also set your salts immediately below that in your config file using auto-generated data from this web page.
If you have problems with columns not found when importing check out our WordPress Multisite tutorial below, which shows how to create those columns then remove them later. They tend to be a legacy of plugins that don’t follow WordPress standards.
You’ll have to reinstall plugins and reconfigure everything. I find this more reliable than trying to move everything over.
Setting up WordPress Multisite
For a good guide to this have a look at this tutorial, though we’re not going to follow it 100% because there are better ways to achieve some things. For example we’ll not configure a caching plugin because we’re going to do that in Nginx later – any way we can avoid executing PHP we will. I’ll write the exact steps and changes I do here.
First open this link to get a randomly generated set of salts for your WordPress install. They’re probably randomly generated during the install anyway, but it doesn’t hurt. Copy it over the existing lines in wp-config.php.
In wp-config.php add the following lines just before “/* That’s all, stop editing! Happy blogging. */”
/* Multisite */
define('wp_pts_ALLOW_MULTISITE', true);
Now log into WordPress, choose tools -> network setup, click “subdomain”, give your network a title and subtitle, and hit install. Ignore the warning that says “Warning! Wildcard DNS may not be configured correctly!” as we don’t want to create an open system where anyone can register a new blog on your server. Copy the config it gives you to your wp-config.php, just under the line you added earlier. Ignore the second part about configuring Apache, we’ll do that later. Now go log into WordPress again.
Now add the plugin “WordPress MU Domain Mapping” using plugins -> add new, and make sure to “network activate”.
Adding A WebSite or Websites to WordPress Multisite
- Choose Sites -> Add New from the WordPress menu.
- Type in the main part of your domain name in the site address box. Don’t worry if it doesn’t match the text around the box. Put something sensible into the other boxes. You can add as many sites as you like here.

Click to enlarge
- Run the following command to copy a file required for domain mapping
cp /usr/share/nginx/html/wordpress/wp-content/plugins/wordpress-mu-domain-mapping/sunrise.php /usr/share/nginx/html/wordpress/wp-content/
- Copy the following to your wp-config.php file, just below the other entries you made
define( 'SUNRISE', 'on' );
- Go to Sites -> All Sites. Hover your mouse over each site and write down the site ID in the URL bar. Yes it’s pretty crude but it’s the best way. For example I have the site ID of two. I’ve blurred out the other domains I’ve added here.
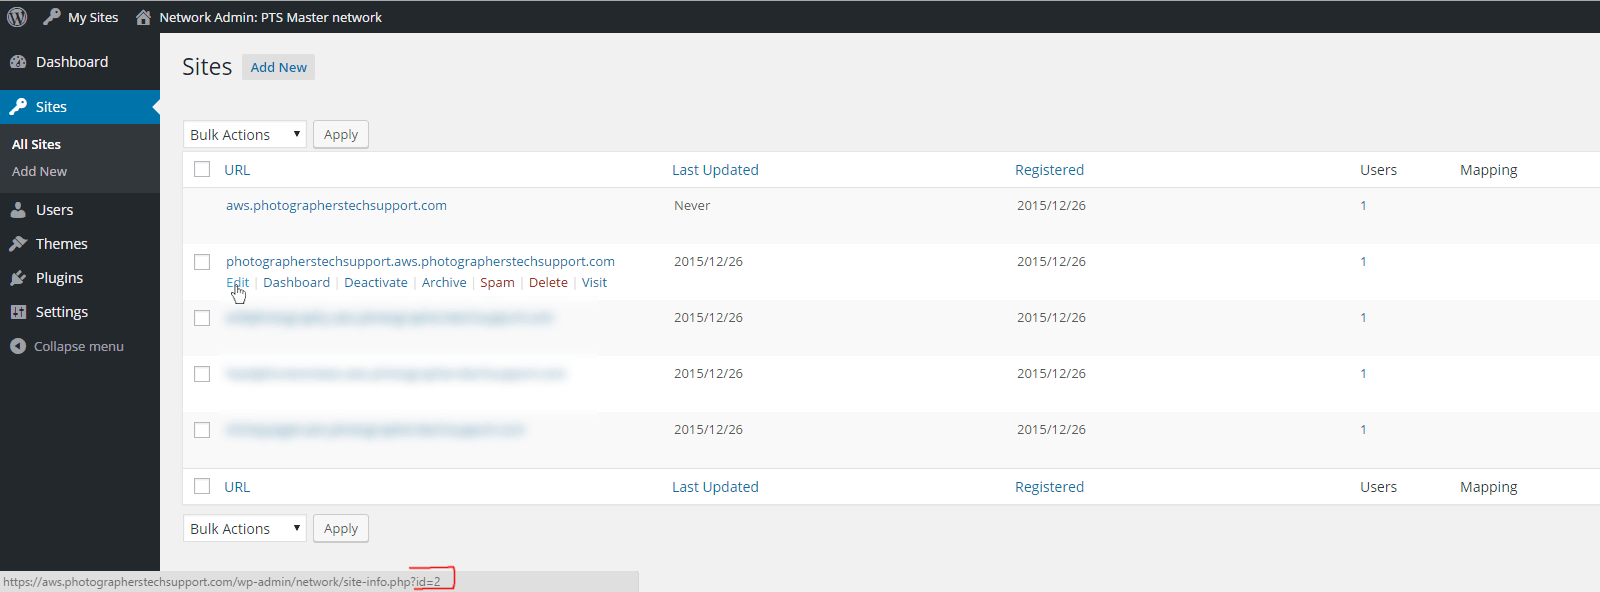
Click to enlarge
- Go to Settings -> Domain Mapping. Enter your domain name along with the site ID – it’s your choice whether to the www or not but add any suffix like .com or .co.uk. You MUST check “primary domain” otherwise it will redirect to the original domain you set up. In the words of the author of the plugin “The primary domain is the one that a visitor will be redirected to if they use one of the other urls (ex. the original url) associated with the site.”. By “original url” they mean the subdomain you created.
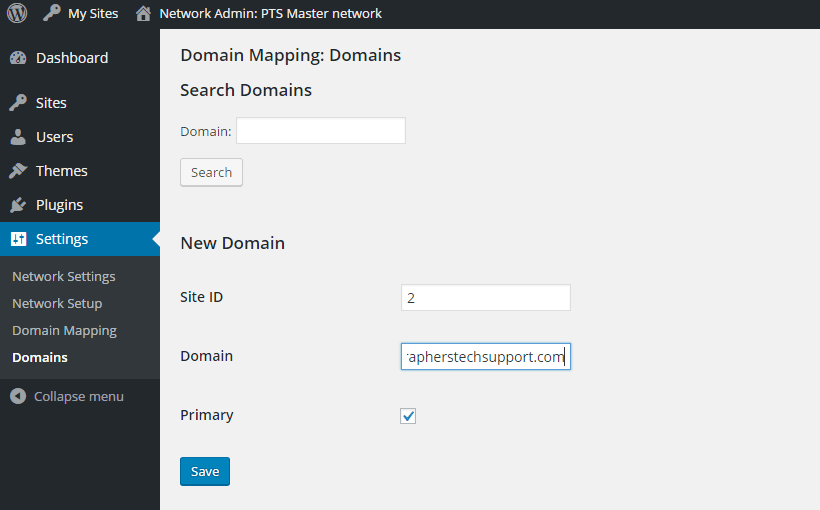
Click to enlarge
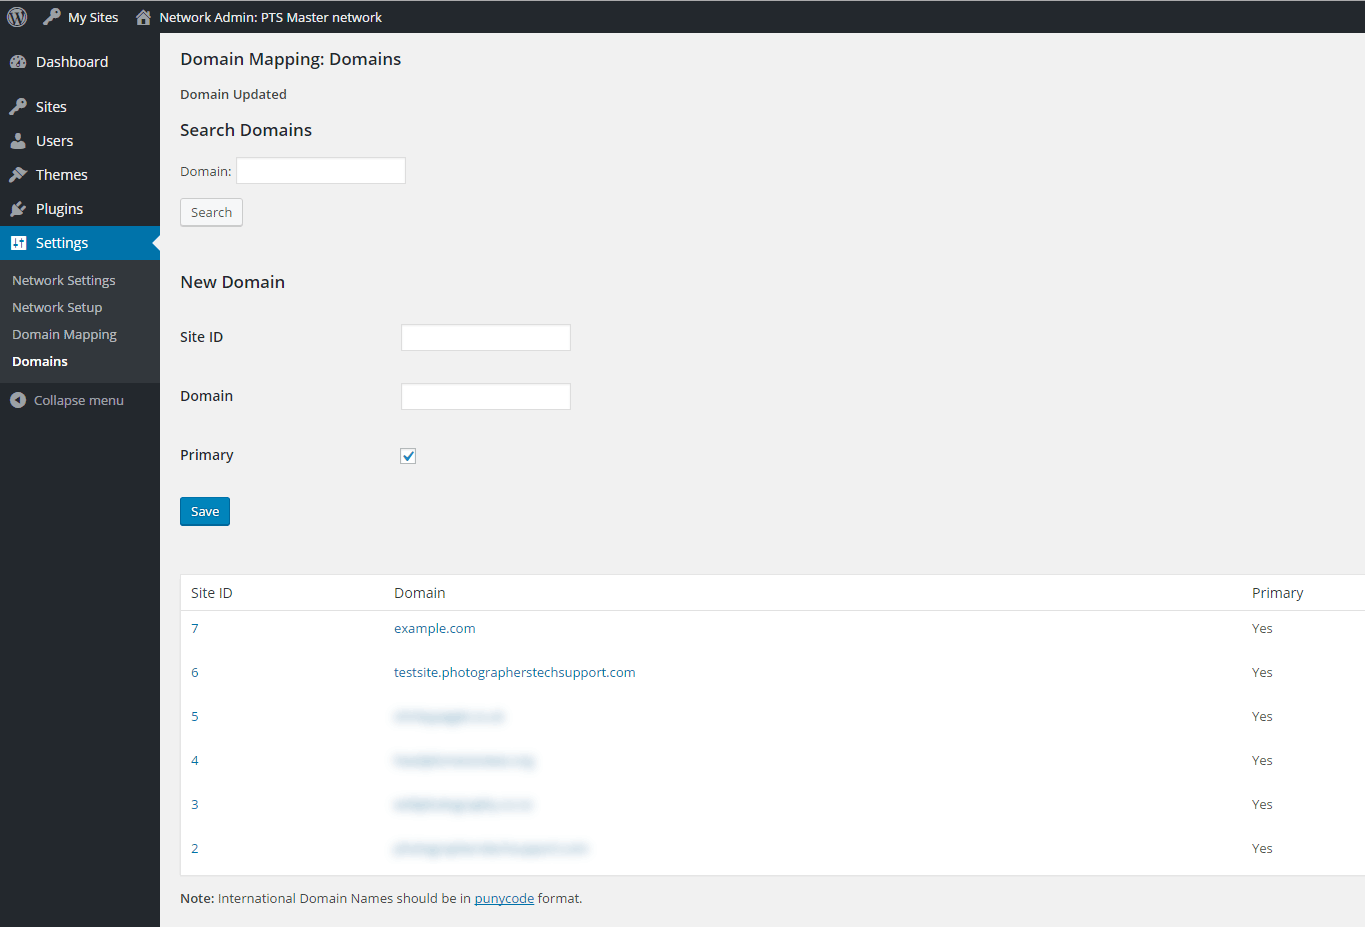
Click to enlarge
- Go to Sites -> All Sites. Hit edit under your new site and change the URL to the proper URL for the domain. This helps the media library show properly, fixes links to the sites in the menu mar, and generally hides the internal domain name.
WordPress is now configured for domain mapping, but Nginx isn’t and you probably don’t have DNS set up yet. Nginx is easily sorted by adding them to the server_name part of the nginx site config file. While testing I have them in the insecure part of the hosting, but I’ll move them over to the https section later. You can download the final nginx configuration from the resources section of the main tutorial blog post. Read on for DNS/hosts file changes.
Note that if you want to change from the www to the non-www or vice versa using you go into settings -> domains and change it there, NOT in the sites -> all sites menu.
Hosts File
If these are existing websites you’re moving over to WPMU add the domains to your computer’s hosts file. This means that even before you change DNS requests for the domain will be sent to the server you’ve set up. On windows open a text editor (eg notepad++, which you’ll probably need later anyway) as admin (find in start menu, right click, start as administrator) and open the file c:\windows\system32\drivers\etc\hosts (on other platforms – Google it). Add a line that looks something like this – for now assume we’re adding the domains photographerstechsupport.com and example.com with the elastic IP you set earlier 1.2.3.4
1.2.3.4 photographerstechsupport.com www.photographerstechsupport.com example.com www.example.com
WordPress Multisite User Management
To let your network admin administer the sites is a simple step. Choose Sites -> All sites, click edit, then click onto the users tab. Type in your admin username, choose administrator, and hit ok. Repeat this for every site you want to administer yourself.
Import an existing website into WordPress Multisite Manually
I’m going to do the import into WPMU using the manual database method as when I tried to export then import my images weren’t in place. If you have a simple site you may want to search for the export/import method, which is simpler, but I couldn’t get working (though I didn’t try very hard).
- Make sure you have a list of your sites and site IDs
- Add all the themes and plugins you want to use on your new site first. This can create tables and columns in database tables, it’s easier to have them there than deal with them
- Log into each site’s control panel and upload an image to force WordPress to create the uploads directory structures you need. I uploaded a single white pixel.
- Move your old images to the new host. Log into your old web host, tar up the images (images barely compress so it’s not worth the bother), get the files from the new host, untar them
Old Host
/public_html/(folder)/wp-content/uploads
tar -cf uploads.tar *
I couldn’t get sftp from my old to my new host to work (I later worked out it was probably security groups locking me out) so I retrieved from AWS rather than pushing it up.
AWS Host

cd /usr/share/nginx/html/wordpress/wp-content/uploads/sites/3  (NB: make sure you use the correct site ID)
curl http://url-of-file > uploads.tar
tar -xf uploads.tar
- Export your WordPress database from your old server. I’m not going to give many details about this other than noting you can use the command line client, or even easier you can do the export using PHPMyAdmin, which is provided by many web hosts. Make sure not to export the following tables: wp_pts_options, wp_pts_users, wp_pts_user_meta, wp_pts_redirects, wp_pts_wf* (Wordfence), wp_pts_hooklist, wp_pts_cf* (contact form 7), wp_pts_ak*.
- If you run the Photocrati theme don’t export the wp_pts_photocrati_fonts, wp_pts_photocrati_themes, wp_pts_photocrati_gallery_settings (maybe), wp_pts_sp_photocrati_ecommerce_settings, or wp_pts_photocrati_styles tables. To put it another way, all you really need to move over is the photocrati_galleries and photocrati_gallery_ids tables.
- I had trouble with extra columns in the wp_pts_posts table, and I only took across data not table structure. I could either have added the columns to the new database or not exported them from the old database. I chose to create the columns in the target database, then to drop the columns afterwards, since they seemed to be effectively empty anyway.
To add the extra columns
ALTER TABLE `wp_pts_3_posts`
 ADD COLUMN `show_in_menu` tinyint(1) NOT NULL DEFAULT '1',
 ADD COLUMN `link_link` tinyint(1) NOT NULL DEFAULT '1',
 ADD COLUMN `no_follow_link` tinyint(1) NOT NULL DEFAULT '0',
 ADD COLUMN `alt_link_text` varchar(250) COLLATE utf8mb4_unicode_ci DEFAULT NULL,
 ADD COLUMN `custom_link_class` varchar(50) COLLATE utf8mb4_unicode_ci DEFAULT NULL,
 ADD COLUMN `redirect_url` varchar(100) COLLATE utf8mb4_unicode_ci DEFAULT NULL,
 ADD COLUMN `target_blank` tinyint(1) NOT NULL DEFAULT '0',
 ADD COLUMN `alt_title_attribute` varchar(250) COLLATE utf8mb4_unicode_ci DEFAULT NULL;
To remove the columns after doing the import (below)
ALTER TABLE `wp_pts_3_posts`
 DROP COLUMN `show_in_menu`,
 DROP COLUMN `link_link`,
 DROP COLUMN `no_follow_link`,
 DROP COLUMN `alt_link_text`,
 DROP COLUMN `custom_link_class`,
 DROP COLUMN `redirect_url`,
 DROP COLUMN `target_blank`,
 DROP COLUMN `alt_title_attribute`;
- Open your exported sql file in a text editor, such as Notepad++. Do a find and replace on the following – I suggest you copy the “from” phrase as it seems to use a slightly odd single quote:
'wp_pts_ with 'wp_pts_(siteid)_ (eg the replace with could be 'wp_pts_3_
- Upload these modified files to your AWS instance. Back up your current database with the first command below, then upload the new files to your database with the next command
mysqldump -h (dbname).rds.amazonaws.com -u (username) -p (databasename) > backupfilename.sql
mysql -h (dbname).rds.amazonaws.com -u (username) -p (databasename) < datafile.sql
- Your images will be linked to the old URLs, such as http://www.example.com/wp-content/uploads/2015/hello.jpg, but the new URL will be something more like http://www.example.com/wp-content/uploads/sites/3/2015/hello.jpg. Nginx could redirect those requests to the new location, preserving the URL (which in theory is good for SEO), but the new posts will use the new location so we might as well just use that. Here’s an example of how to change the image URLs in your existing posts – of course you need to use the correct URL, table name and site ID. Take note of www vs non-www URLs and http vs https URLs, your website should only respond to one not both or all four – we’ll set up a redirect later.
mysql -h (dbname).rds.amazonaws.com -u (username) -p (databasename)
use (databasename)
UPDATE wp_pts_3_posts SET post_content = replace(post_content, 'http://www.example.com/wp-content/uploads/', 'http://www.example.com/wp-content/uploads/sites/3/');
- With this all of your pages, posts and images should be in the new database, and you should be able to see them if you browse to the site. You’ll have to set up menus, page/post authors, and no doubt a lot of other little things to get things looking perfect. You may have to flush your DNS cache if you’re using a hosts file (“ipconfig /flushdns” in a Windows command prompt), or use a different web browser to see the changes.
- Reset file permissions back to what they should be (see the permissions section above).
WordPress Cron
WordPress Cron does background maintenance on your website, including running things like backup plugins. It typically gets run when someone hits the website, but a more efficient way is to run it manually with PHP using Unix cron. Here’s how you do that
First disable the standard WP cron but editing wp-config.php to add this line
define('DISABLE_WP_CRON', true);
Now run crontab (a Unix utility) to set up your cron job to call the wp-cron script regularly.
sudo crontab -e
Then add this line to the bottom of the file to run cron every 15 minutes (NB: see below, this doesn’t seem to work properly)
*/15 * * * * php -q /var/www/wordpress/wp-cron.php >/dev/null 2>&1
UPDATE
This hasn’t been working well for me recently, so instead use the command below. It’s also safer, as if you have multiple PHP versions installed you can be sure the correct version is used. I have cron call a script that runs the command, which is easier to maintain
*/15 * * * * wget -q -O - http://www.photographerstechsupport.com/wp-cron.php?doing_wp_cron
Next Steps
At this point you should have WordPress working on your AWS server, all your content imported, and you could go ahead and take the server live if you had to. Read part four of our AWS/WordPress tutorial to learn how to optimize the configuration for performance and security.
Background Information and Useful Resources
- Rackspace on the basics of Linux file permissions.
- WordPress Multisite with Nginx
- Nginx WordPress Standard and Multisite Configurations from Nginx
- Moving a WordPress Website into WordPress Multisite